Showing posts with label repro. Show all posts
Tuesday, August 28, 2012
Cactus Canyon collectors plate
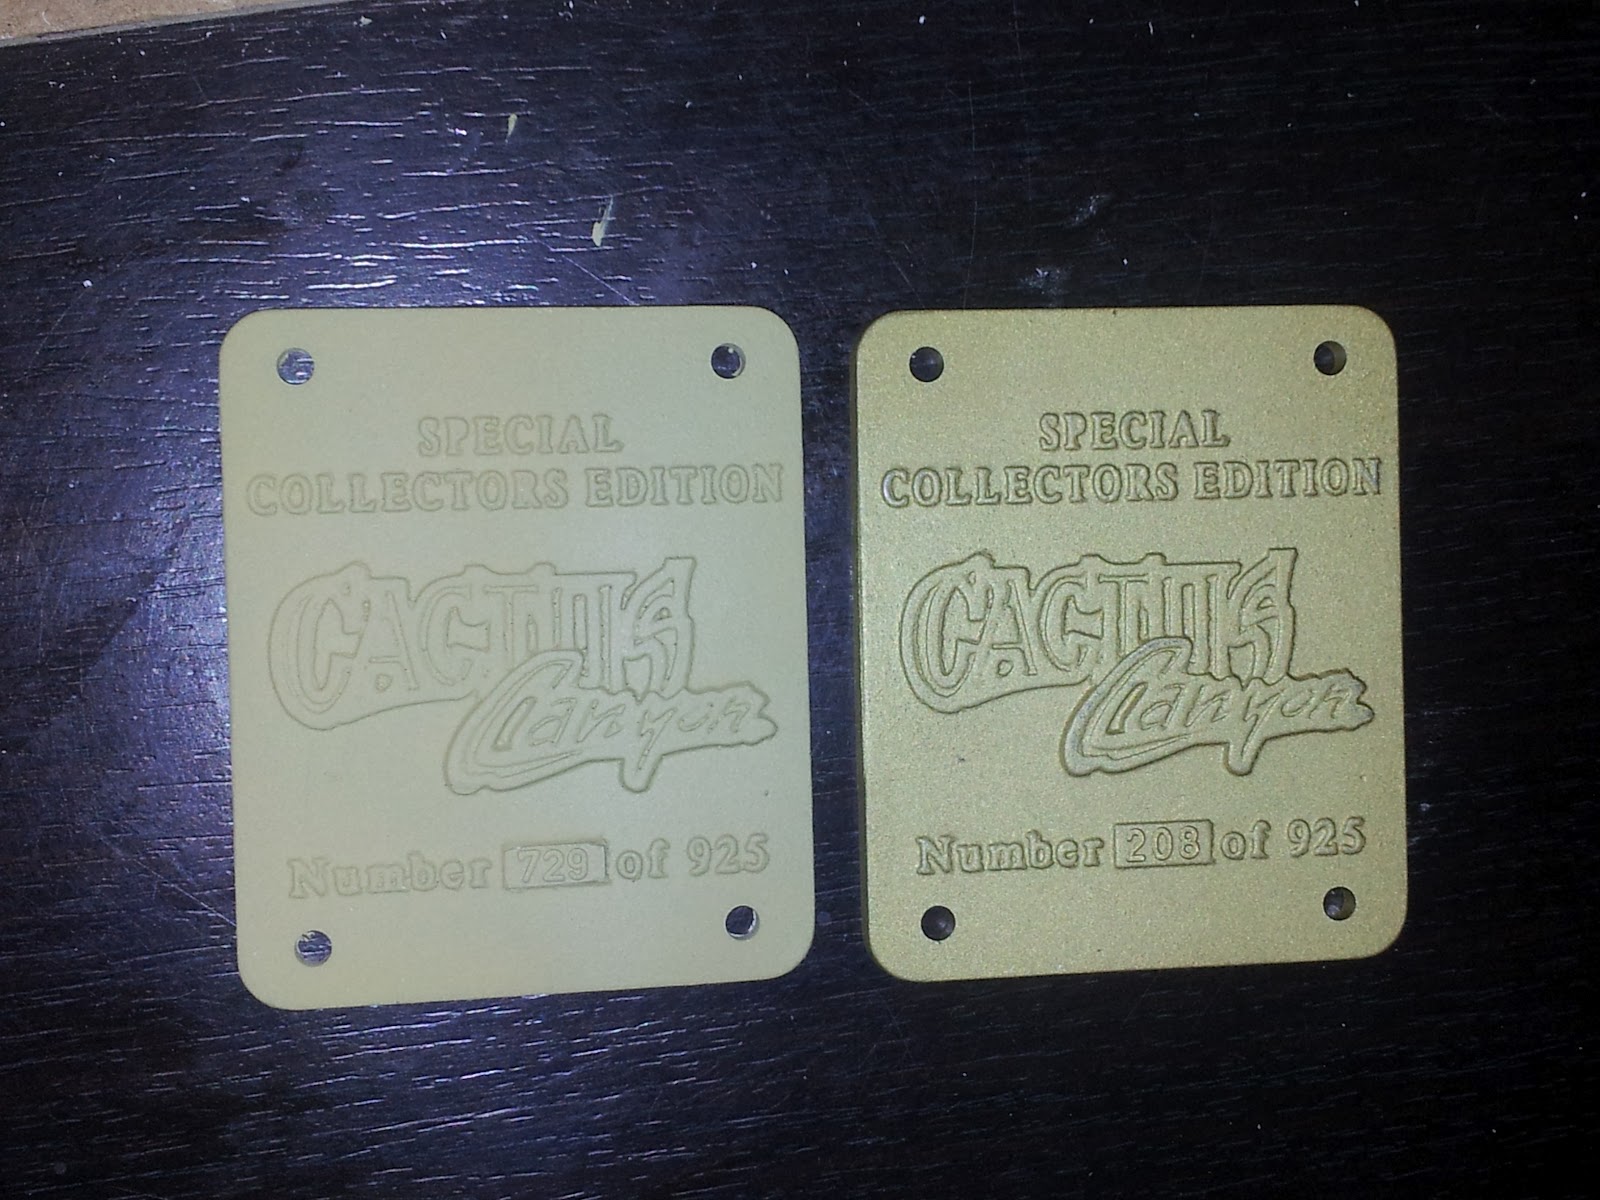
I finally have a matching collectors plate for my Cactus Canyon number 729 !
No it's not an original, I made it myself. Borrowed an original from a friend, made a silicone mold and cast a reproduction piece. Had the number engraved at a sign shop so it would match the font size and type of the original, and then airbrushed the color myself as the original cast plastic was white.
It's not exatly matching the original: the material used is totally different (resin plastic, originals are a light metal alloy) and the color also isn't a complete match, the original has some metal flakes in the paint that make it look sharper.
But still it's good enough for me as it's probably impossible to find the matching original number for my game, installed on the apron of my game almost nobody will notice any difference..
Labels:
cactus canyon,
repro
Wednesday, June 15, 2011
PinLed replacement cpu installation
Installed a Pinled replacement WPC cpu board in a Hurricane.
The game had damage on the original cpu board because of a leaked battery.
It had switch matrix problems, some switches wouldn't register well, when you went in test, the game always went back out of the menu, turned the sound down, ..
While it is possible to repair this, it takes a lot of time and when you don't repair everything, it's possible that the damage will still continue to spread, and somewhere in the future the board will break down again.
With new reproduction cpu boards available for a reasonable price, it's usually better to buy a new board, than to pay someone a lot of hours to repair the damage and replace all the resistors/diodes/ics that are in the area below the batteries.
So a new reproduction WPC cpu board was bought from www.pinled.de
Its size is the same as the original board, connectors are in identical positions.
What I found odd was that there was no documentation at all provided together with the board.
There are 3 ICs you need to replace, one of which is the ASIC.
You need a special tool for this, don't try it without !
Replaced the 3 ic's, put the new board in.. didn't work. Damn.. did I by accident damage the asic or another ic ? There are also some dip-switches, maybe they needed to be set.. but no documentation on how to do it, there is only some printed text on the board.
To be sure I put the ic's back onto the original board. This still worked. Good news, I didn't damage them. Then put them again on the pinled reproduction board.
Checked the website, searching for information about these jumpers.
All our boards come with detailed installation instructions.. yeah sure :-(
Found a page with installation instructions in german and english for all of their boards.. all of their display boards that is - but not for boards 10036 and 10037, which are their WPC and WPC-S replacement boards.
So time to read the small print on the board and try some settings.
All dip-switches by default come in the off position. The board won't work like that :( The game seems to reboot the whole time, of the 3 leds on the top left of the cpu board, the bottom will stay on, and middle will blink 1 time. As on the original cpu board, the top one should go out, bottom stay on, and middle should go on/off all the time.
Dipswitches 1 and 2 are set according to the eprom size. 512/1mb, or 1/2/4mb.
Therefor you set them on/off or off/on.
The other switches have something to do with ram size and battery settings.
Some of their default presets are printed on the pcb.
Anyway I just started testing some combinations and finall got the board to start.
Don't remember exact settings, I'm certain it was set for 1/2/4mb, don't remember if the other settings about battery were all off or some on.
Once the board worked, I had no issues with it. It works identical to the original board. The game played well, all tests, settings and adjustments were done, ..
So when you have a battery damaged board that has switch matrix problems, just buy a new one. It works - but it would be a bit better if pinled would provide it with installation instructions for the dipswitch settings (or let you say for what game it is so they already set it)
The game had damage on the original cpu board because of a leaked battery.
It had switch matrix problems, some switches wouldn't register well, when you went in test, the game always went back out of the menu, turned the sound down, ..
While it is possible to repair this, it takes a lot of time and when you don't repair everything, it's possible that the damage will still continue to spread, and somewhere in the future the board will break down again.
With new reproduction cpu boards available for a reasonable price, it's usually better to buy a new board, than to pay someone a lot of hours to repair the damage and replace all the resistors/diodes/ics that are in the area below the batteries.
So a new reproduction WPC cpu board was bought from www.pinled.de
Its size is the same as the original board, connectors are in identical positions.
What I found odd was that there was no documentation at all provided together with the board.
There are 3 ICs you need to replace, one of which is the ASIC.
You need a special tool for this, don't try it without !
Replaced the 3 ic's, put the new board in.. didn't work. Damn.. did I by accident damage the asic or another ic ? There are also some dip-switches, maybe they needed to be set.. but no documentation on how to do it, there is only some printed text on the board.
To be sure I put the ic's back onto the original board. This still worked. Good news, I didn't damage them. Then put them again on the pinled reproduction board.
Checked the website, searching for information about these jumpers.
All our boards come with detailed installation instructions.. yeah sure :-(
Found a page with installation instructions in german and english for all of their boards.. all of their display boards that is - but not for boards 10036 and 10037, which are their WPC and WPC-S replacement boards.
So time to read the small print on the board and try some settings.
All dip-switches by default come in the off position. The board won't work like that :( The game seems to reboot the whole time, of the 3 leds on the top left of the cpu board, the bottom will stay on, and middle will blink 1 time. As on the original cpu board, the top one should go out, bottom stay on, and middle should go on/off all the time.
Dipswitches 1 and 2 are set according to the eprom size. 512/1mb, or 1/2/4mb.
Therefor you set them on/off or off/on.
The other switches have something to do with ram size and battery settings.
Some of their default presets are printed on the pcb.
Anyway I just started testing some combinations and finall got the board to start.
Don't remember exact settings, I'm certain it was set for 1/2/4mb, don't remember if the other settings about battery were all off or some on.
Once the board worked, I had no issues with it. It works identical to the original board. The game played well, all tests, settings and adjustments were done, ..
So when you have a battery damaged board that has switch matrix problems, just buy a new one. It works - but it would be a bit better if pinled would provide it with installation instructions for the dipswitch settings (or let you say for what game it is so they already set it)
Wednesday, April 6, 2011
Cactus Canyon repro guns and mountain
Something else I'm working on since a few weeks: learning to make my own molds in silicone and make reproductions from objects.
More specific, I'm trying to repro the Cactus Canyon mine mountain plastic and the gun handles.
A full article will appear on my site in the future when I'm finished and learned enough.
Cactus Canyon mountain plastics were unobtainable for the last years. Suddenly a few have appeared on ebay but they are much too expensive for me.
My mountain isn't really bad but not mint either.
Many years ago I looked a bit into casting parts in resin (Leon of pinballleon.com then also did and he sells Scared Stiff boney flippers he casts himself).
Since then I never needed anything.. until now.
Now buying a NOS cactus canyon mountain plastic is no option for me, it was time to pick up this project and try to make one myself to improve my pinball machine.
And I've seen pictures of someone who has customised his Cactus Canyon pinball machine by painting the gun handles and it looked great !
But I prefer to have original parts on my machine - therefor I also started to make a mold for the gun handles. It was easy to do as they're small and flat.
Now I can keep my original parts - in case I ever decide to sell my game and the buyer prefers to have everything original. But I can make replacement parts to paint and customize it like I want, and not be afraid of messing up a part that's not replaceable.
2 weeks ago I made a mold for the gun handles. Poured epoxy in it, worked fine.
First test was a success, I learned to make a mold and cast resin.
The mold for the gun handles is good. Details are nice and sharp. Compared side by side with an original you may see some very small differences, but installed in the machine you wouldn't know it was a reproduction piece.
Last week then I made a big mold for the lost mine mountain plastic.
Gave it enough time to cure, and this week I tried to cast my first plastics.
First didn't work well, I had used too much material. It was too thick and heavy.
The mountain is hollow, so unlike the gun handles, you can't just fill it completely with resin. Making a cast of this requires a special technique.
It was a good test for my mold to see if the shape was correct. Only where I had closed the hole it's not perfectly smooth.
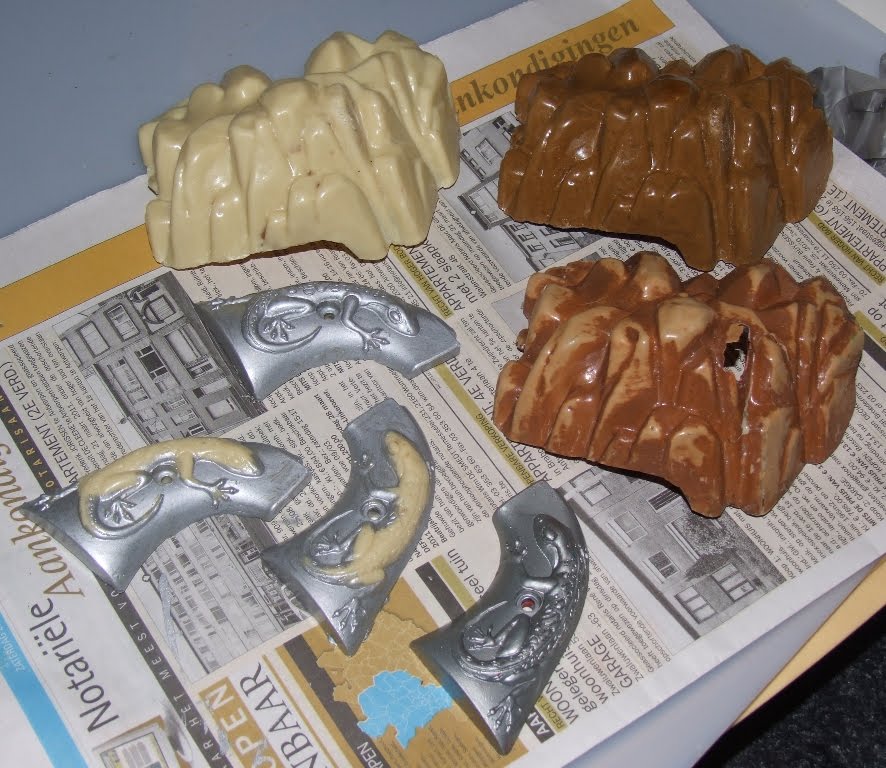
In the picture below you see my next trials. Middle right is my original lost mine plastic. At top left is my second attempt. The shape is fine, but it's a little bit too thin. I used about 60 gram of epoxy in that one. It also shows the natural color of the poly-urethane resin. I get better practice getting an even layer of resin all around, to cast a hollow object.
Top right is my third try of casting a cactus canyon mountain plastic.
I added brown pigment to it, trying to simulate the original color. Looks like I've added too much, the color is too dark. Also used a bit too much epoxy, about 80 grams in total. The mountain plastic is strong but the edges were difficult to cut. So next time I'll try 65 to 70 gram of epoxy and less brown pigment..
I'd like to get the resin in the correct color so I only have to paint additional color to have it match the original color scheme. If I don't succeed in matching the color I'll just take that unpainted one and give it two layers of paint so it matches. But too many layers of paint may block the light from the flasher lamp that's underneath in the game..
On the bottom in the picture are the gun handles. Bottom right is an original one.
The other three I've casted.
One painted completely silver, and the other two I haven't painted the lizard yet. Will paint this green (or maybe another color, I'm not sure yet).
I haven't made a mold yet for the rest of the gun, I'm considering doing this also.
Original they're black, but I think they'll look much better in chrome/silver, like real guns do. But as they're two large plastics, a lot of silicone will go into them.
Don't know yet if I want to spend that much on material just to cast one pair of guns for myself..
Update: article is ready about casting your own 3D pieces using a silicone mold.
More specific, I'm trying to repro the Cactus Canyon mine mountain plastic and the gun handles.
A full article will appear on my site in the future when I'm finished and learned enough.
Cactus Canyon mountain plastics were unobtainable for the last years. Suddenly a few have appeared on ebay but they are much too expensive for me.
My mountain isn't really bad but not mint either.
Many years ago I looked a bit into casting parts in resin (Leon of pinballleon.com then also did and he sells Scared Stiff boney flippers he casts himself).
Since then I never needed anything.. until now.
Now buying a NOS cactus canyon mountain plastic is no option for me, it was time to pick up this project and try to make one myself to improve my pinball machine.
And I've seen pictures of someone who has customised his Cactus Canyon pinball machine by painting the gun handles and it looked great !
But I prefer to have original parts on my machine - therefor I also started to make a mold for the gun handles. It was easy to do as they're small and flat.
Now I can keep my original parts - in case I ever decide to sell my game and the buyer prefers to have everything original. But I can make replacement parts to paint and customize it like I want, and not be afraid of messing up a part that's not replaceable.
2 weeks ago I made a mold for the gun handles. Poured epoxy in it, worked fine.
First test was a success, I learned to make a mold and cast resin.
The mold for the gun handles is good. Details are nice and sharp. Compared side by side with an original you may see some very small differences, but installed in the machine you wouldn't know it was a reproduction piece.
Last week then I made a big mold for the lost mine mountain plastic.
Gave it enough time to cure, and this week I tried to cast my first plastics.
First didn't work well, I had used too much material. It was too thick and heavy.
The mountain is hollow, so unlike the gun handles, you can't just fill it completely with resin. Making a cast of this requires a special technique.
It was a good test for my mold to see if the shape was correct. Only where I had closed the hole it's not perfectly smooth.
In the picture below you see my next trials. Middle right is my original lost mine plastic. At top left is my second attempt. The shape is fine, but it's a little bit too thin. I used about 60 gram of epoxy in that one. It also shows the natural color of the poly-urethane resin. I get better practice getting an even layer of resin all around, to cast a hollow object.
Top right is my third try of casting a cactus canyon mountain plastic.
I added brown pigment to it, trying to simulate the original color. Looks like I've added too much, the color is too dark. Also used a bit too much epoxy, about 80 grams in total. The mountain plastic is strong but the edges were difficult to cut. So next time I'll try 65 to 70 gram of epoxy and less brown pigment..
I'd like to get the resin in the correct color so I only have to paint additional color to have it match the original color scheme. If I don't succeed in matching the color I'll just take that unpainted one and give it two layers of paint so it matches. But too many layers of paint may block the light from the flasher lamp that's underneath in the game..

On the bottom in the picture are the gun handles. Bottom right is an original one.
The other three I've casted.
One painted completely silver, and the other two I haven't painted the lizard yet. Will paint this green (or maybe another color, I'm not sure yet).
I haven't made a mold yet for the rest of the gun, I'm considering doing this also.
Original they're black, but I think they'll look much better in chrome/silver, like real guns do. But as they're two large plastics, a lot of silicone will go into them.
Don't know yet if I want to spend that much on material just to cast one pair of guns for myself..
Update: article is ready about casting your own 3D pieces using a silicone mold.
Labels:
cactus canyon,
repro
Monday, February 4, 2008
new Tommy blinders repro board developed !
Good news for owners of a Data East Tommy pinball machine !
I can already announce that someone has developed a repro pcb board that drives the blinders. A lot of Tommy owners have problems with this board, and the game is just only half the fun if you cannot play it with the blinders closed.
A good friend of us has developed this repro pcb (it's a total new design using smd components), this weekend we have tested his prototype in our own Tommy (he was just in time as our game is sold and picked up later this week).
It worked perfect, like the original board it has 2 adjustment pots to set how far the blinders open/close, it worked fine in the self-tests of the game, ..
Anyway the prototype is ready, production will start soon (is a matter of days/weeks), so very soon it'll become available ! Watch this space (or other forums) as I'm sure there will be enough public announcements for it..
UPDATE 2011: as I got some emails about these. It seems they are not available anymore. The person who designed them does not work at that company anymore, and the company that produced them seems not to reply to emails or isn't interested in selling pinball parts anymore.
I can already announce that someone has developed a repro pcb board that drives the blinders. A lot of Tommy owners have problems with this board, and the game is just only half the fun if you cannot play it with the blinders closed.
A good friend of us has developed this repro pcb (it's a total new design using smd components), this weekend we have tested his prototype in our own Tommy (he was just in time as our game is sold and picked up later this week).
It worked perfect, like the original board it has 2 adjustment pots to set how far the blinders open/close, it worked fine in the self-tests of the game, ..
Anyway the prototype is ready, production will start soon (is a matter of days/weeks), so very soon it'll become available ! Watch this space (or other forums) as I'm sure there will be enough public announcements for it..
UPDATE 2011: as I got some emails about these. It seems they are not available anymore. The person who designed them does not work at that company anymore, and the company that produced them seems not to reply to emails or isn't interested in selling pinball parts anymore.
Thursday, May 24, 2007
Haunted House backglasses available
More reproduction news, today was posted on RGP that Haunted House repro backglasses are available.
Licensed reproductions, perfect quality, exact like the originals were.
More info at the site of classicplayfields
Licensed reproductions, perfect quality, exact like the originals were.
More info at the site of classicplayfields
Labels:
Haunted House,
repro
Subscribe to:
Posts (Atom)