
Thursday, December 30, 2010
Tuesday, December 28, 2010
Friday, December 24, 2010
Merry christmas
Merry christmas everyone !
I already opened some gifts, got even one for my own.. stuff to polish metal:sandpaper in all types and polishing compound.
Will experiment with it soon..
I already opened some gifts, got even one for my own.. stuff to polish metal:sandpaper in all types and polishing compound.
Will experiment with it soon..
Monday, December 20, 2010
Nikon D90 CHA error
My Nikon D90 camera started to give problems a few weeks ago.
After taking a few pictures it just blocked, showing CHA and ERR on the top display.
The camera completely froze, the only way to get it working again was taking out the battery. I first thought it was some compatibility problem with my Metz flash (as it started to occer when I used my flash more often), but after taking a series of pictures without flash it was obvious this was not the culprit.
The CHA error means there is a problem with the SD memory card.
I luckily have a spare 4gb card, put that one in, and since then I haven't seen the error come back.
Dont know how my 8gb memory card became bad..
I usually format it in my camera (which does it very quick), have now formatted it too on the computer (which took a bit longer, so maybe it was more thorough).
When I have some time I'll put that memory card back in and see if the error comes back..
Thursday, December 16, 2010
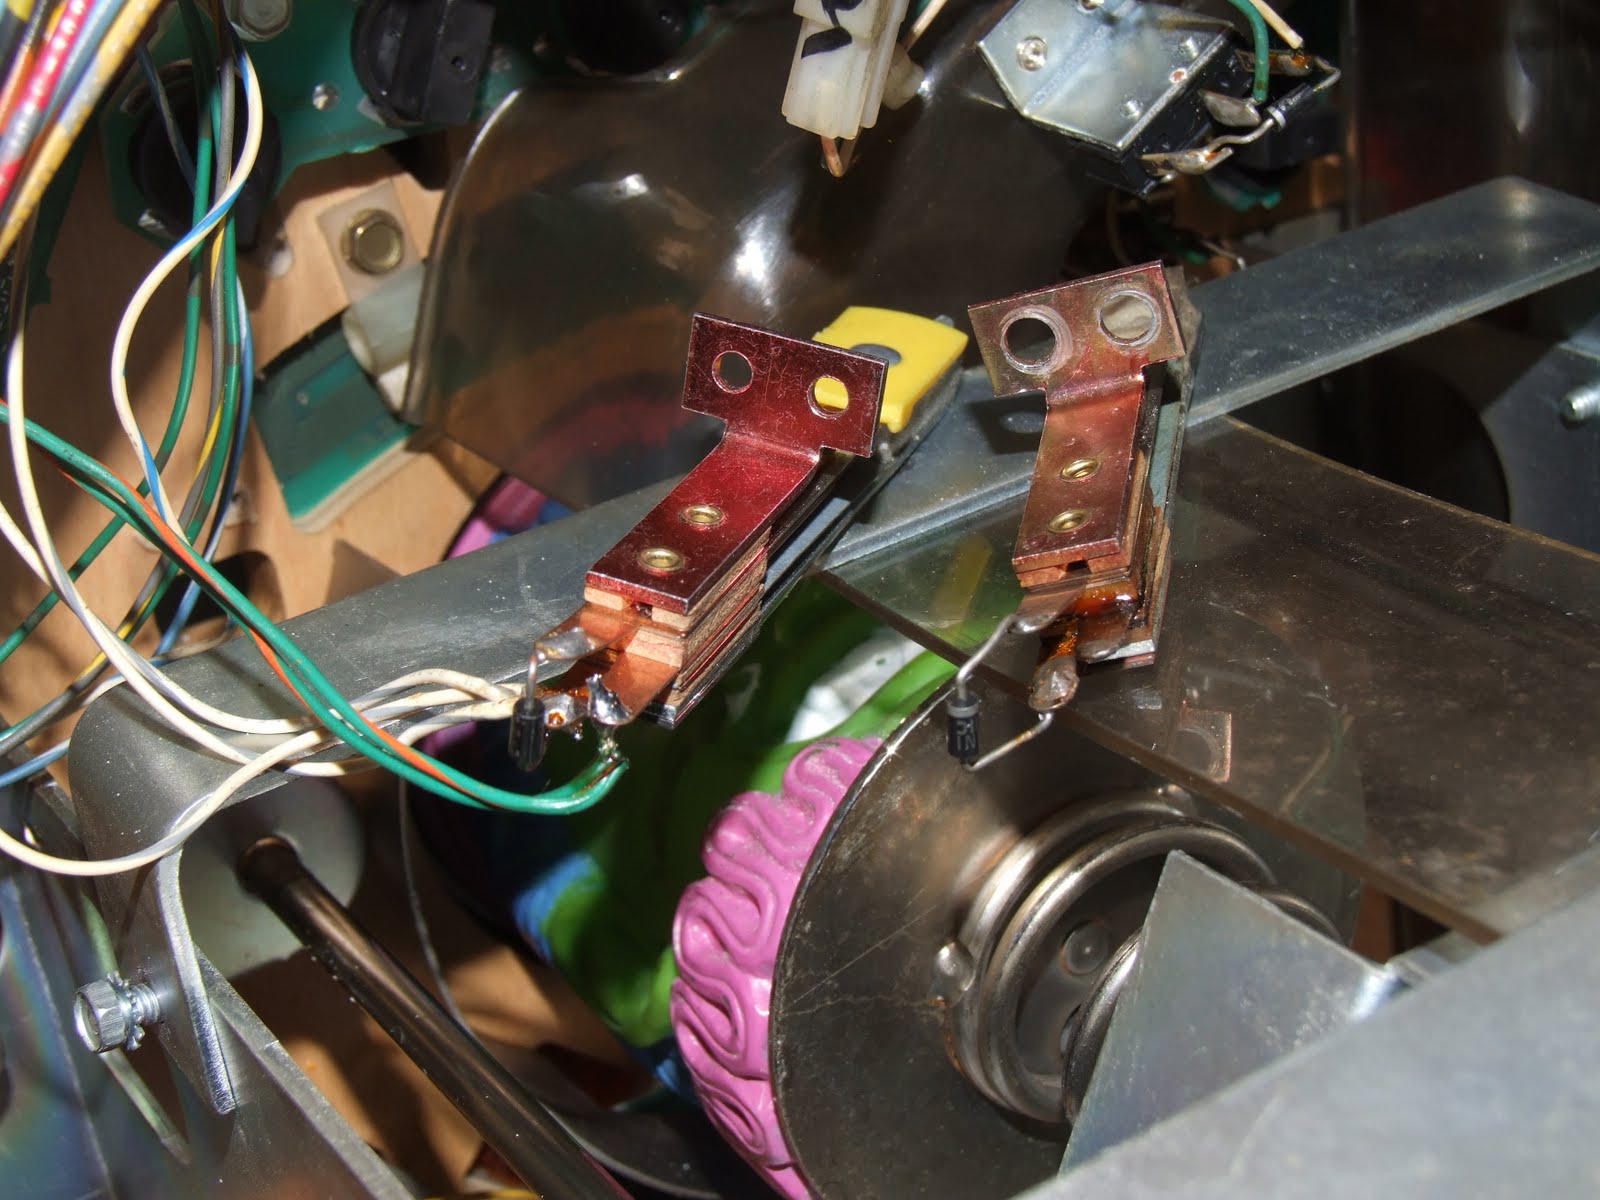
Midway Captain Kid gun game repair
Yesterday evening I finally continued working further on my Midway Captain Kid rifle game. We bought this many months ago, it did start but only half of the features worked.
This summer I had already removed the large bank with targets that's at the bottom of the game. I cleaned everything. You can't imagine how much better the game looks with all dirt wiped off ! Colors are again fresh and bright.
Replaced some wires to the moving pirate assembly as some wires had just completely melted. I had assembled it again but then the gun didn't register anymore for some reason.
Since then the game just sat in a corner, I had too many other things to do that were more important.
Yesterday evening I finally started checking out this game.
What I did first was put the game on its side and remove some damaged wood at the bottom. Along the edge there is some wood, half of it was damaged and missing, which made the game unstable. I removed all the damaged wood so not it stands on its flat bottom. I did put some sticky felt at the bottom to protect the floor.
In our house we have damaged too many floors in the past because of pinball or other arcade games with sharp or damaged feet/leg levellers. Now we've installed new tiles and a new wood floor in our living room and we will take care of it. Any game that comes in now is checked and action is immediately taken so it can not damage our floors anymore..
Next step was putting the targets assembly back in. (I had removed it to make the game lighter when I was going to tip it on its side)
Then I tried to test it.. but the game just didn't do anything ?
Not one light lit up. Weird. Normally when you plug it in at least the lights should come on..
I have a step-down transformer from 220volts to 110v (the machine is old and only works on 110v input, it cannot be jumpered to 220v). So I was careful and checked if the transformer still did its thing and 110v arrived into the game.
(A few months ago I had also replaced the power wire as that was severely damaged and replaced all fuse holders).
Power seemed to arrive into the game but still nothing worked.
Flicked the power switch a few times, no difference.
Weird, as it had worked a few months ago ?
Now I'm getting nervous. I do not like working around transformers - you really have to be careful. Especially when not one light works so it's not obvious if the game has power or not (and what parts). So although nothing lit up, it was very possible that line voltage was present in every part of the game.
I was sure to double check each time if the game was plugged in or not before I touched anything. Traced the wiring going to the fuses, transformer, power switch, ..
Didn't learn a thing, didn't find a problem.
Note on these old games, part of the line voltage is always present at the transformer and fuses once the game is plugged in, no matter if it's switched on or off !
Some parts of this game (like the recoil coil underneath the gun) even need 110v to work. So when working on an old machine like this you always have to be careful what to touch and what wires to measure, even with the wiring deep inside the cabinet.. I'm not comfortable working on games like this.. but I do hope to get it working soon.
Output of the transformer are 6 volts (for lights), 50 volts (for motors/relays) and 110 volts (for some ligthbulbs and coils).
Anyway switching the machine on or off didn't change anything ? In the end I began to doubt if the power switch worked at all. As the switch is located on top of the machine and I would never use it in home-use (I just unplug the game or put it on an extension cord with a switch) I thought the best was to simple remove (override) it.
Cut both wires going to the switch and connected them permanently.
Tested again.. and yes, at least now the game lit up !
So it was a broken power switch after all.
The game still worked half, just like before.
You can start a game, time starts to run, you can fire shots, and it ends the game correct with time is up or you've had enough shots.
So that's already a pretty good situation I found.
What doesn't work are some individual features. Repairing them shouldn't be too hard as they are all controlled by a their specific relays (which are clearly labelled in the backbox).
The large disk with targets goes around and registers shots correctly (which is pretty neat, a small coil retracts each target as you hit it).
At first the game is completely lit, and after 5 or 10 shots (don't remember exactly, I think 5) the game goes dark and you shoot with only the blacklight on.
This is a pretty cool effect as all targets are decorated with special luminous paint.
Shoot enough targets and the flags on both sides should become active. A motor pulls them up pretty fast and they drop down when you can't shoot them before they reach the top.
This feature doesn't work correctly on my machine - only 1 flag moves up and it doesn't register shots :-(
Finally there's a pirate at the bottom which also should move around (that's the assembly that had completely melted wires). It also doesn't move at all during gameplay.
Have to check this too. I already manually activated some relays in the backbox and that let the assembly turn in one direction. Another relay that controls the direction seemed to stick a bit (they're actually 2 small relay coils mounted against each other, when one moves down the other just has enough space to move up).
I looked at all these relays in the backbox. One has a broken metal contact point. Have to be creative to repair it as I don't have replacement parts for Midway..
A few others didn't move very well, I will disassemble and clean them. I think the best will be to clean them all one by one and measure them with my dmm, as I checked a few and not all gave good contact..
Once that is all done I hope a few features work more..
Wednesday, December 15, 2010
Funhouse is back
Sunday evening I finally was able to buy a Funhouse pinball machine again !
It's my Christmas gift for my wife :-)
This is already the third Funhouse game we have since we started with pinball machines.. the first one we had bought back in 2001 I think.. sold it after about a year to make room for more games. We were new to pinball machines and bought and sold a lot of different titles as we didn't know yet which ones we would enjoy more.
Then we missed it (it's one of the only games we really missed after having sold it), looked around for a nice example (most are played to death, have major playfield damage, inserts that raise above the playfield wood, ..).
As that machine was going to be a keeper we looked around for about a year until we found one that I really liked and was in good condition. I wanted it to have a reasonable good cabinet (this was before new cabinet decals were available) and a good playfield. If I remember correct it had a bit of playfield wear but not much (only the traditional wear below the kickout on the right and a bit between the bumpers). It did not have a playfield mylar on it, so the blue paint had not been discolored.
I think we kept that machine for 3 years. About 3 years ago we had a dip in collecting pinball machines and sold off a few games, we let this one go.
Last month my wife said she really missed her Funhouse. About a week later I found this machine for sale.. what a coincidence ! and a good excuse to buy a Funhouse pinball again (as it really is a great game) ! The price was reasonable (certainly not a steal, but its condition was good enough to consider it.
Now the gameroom is really full again.
The machine is in quite good condition. Cabinet is faded (maybe I'll ever buy new cabinet decals for it) but has no scratches, .. There are some technical issues, but I'm able to fix them. It needs a new battery holder and a new gear for Rudys jaw. Some teeth are broken off, his jaw does not stay open so you cannot start multiball (making the game no fun to play at all).
One coil also didn't work well but I already fixed it, maybe I'll need to replace the coil later if the problem comes back.
Finally the eyes don't work well. The eyelids don't close completely, and the eyes don't move left or right at all. I already peeked in his head and noticed some parts are completely missing (like the metal wire that connects both eyes) :-(
Hope I'll be able to find the missing parts as not all are common..
But that's for later, when I ever shop the game completely then I'll disassemble Rudys head.
The metal lampsign near the diverter that illuminates the trapdoor is also completely missing :(
The playfield itself is in rather good condition. This game probably has less games on it than most average Funhouse machines you find..
The playfield has mylar installed, which is still in good condition. The clock inserts are still level, the mylar only has a few small bubbles above them.
Amazingly there is no wear at the right kickout or between the bumpers ?!
There is only some wear in the clear red color at the very left side of the game, where the pinball drops out of the steps ramp onto the playfield.
That's something I can touch up later.
Finally the ramps are also in good condition, a few have a small crack at the entrance but no pieces have broken off. After cleaning, flamepolishing and installing Cliffy protectors, they will probably look brand new.
That goes for the whole machine.. it looks already good enough as it is now, and should I ever decide (and find time) to do a complete restoration of it, it will probably look very good.
Wednesday, December 8, 2010
Majorettes is ready
Our Gottlieb Majorettes wedgehead pinball machine is restored and in our house !
Henk De Jager had completed it already a few weeks ago (just before the Rosmalen jukebox show), but we didn't have room in our house as we were renovating the living room.. then our car broke down just the day before Nikky had planned to pick up the game. :-( (luckily the car was fixed a day later, but our meeting with Henk was delayed for a week)
Last week Nikky was finally able to drive all the way to Amsterdam to meet Henk and pick up the game. Nothing was going to stop her, even not a snow storm !
A few days before it had started to snow in Belgium and the Netherlands, road were blocked, traffic jams everywhere,.. but Nikky was going to retrieve that game and not delay it for another week. She drove over 5 hours in total.
Was it worth it ? Definitely !
Henk did a beautiful job restoring the wiring on the game back to original condition. Everything now works like it should.
Majorettes got a nice place in our new living room, it's the center piece of attention and I often play it..
Henk put in a 5 cents coin mechanism (the game isn't on free play) so I'm saving up all my small change :-) This week at the bakery I deliberately paid with coins so I would get a 5 euro cent piece in return (which I used to play a game with).
A friend came over yesterday and also had to play a few games..
The first days when I set the game up, I had put black rubber cups underneath the leg levellers, so it wouldn't scratch our tile floor. However this makes the game really stick in position, it's difficult to nudge. And nudging is really necessary when you want to play an electro-mechanical pinball machine like this ! Most of the skill involved when playing these old games is less about aiming with flippers, but controlling the ball and nudging it.
So therefor I now put some sticky felt patches underneath the rubber cups. That way it's a bit easier to nudge and move the game around.
On Majorettes nudging the game is even more required than with other electro-mechanical pinball machines. To earn an extra ball (the game is add-a-ball: you start with 5 pinballs but can earn more) you need to hit each of the 5 yellow or red popbumpers in sequence. The 5th bumper on each side however is positioned below the flippers ! So either you lose the pinball when trying to light it, but the 'outlanes' (not really outlanes like on a modern pinball machine as there's no metal divider) are really big with a large rubber ring at the bottom, and there's a hole between the flippers which will kick the pinball back onto the playfield.
Part of the gameplay is to try and get the pinball below the flippers, have it hit the 5th popbumper, and shake it back into the game by either bouncing the pinball off the rubber bands above the flipper bats, or into the hole.
I love it.
Gameplay and rules are pretty simple. I'll describe the whole rules/layout:
at the top of the playfield there are 3 rollovers at each side. The outer lanes score 50 points, the two others put out a letter (ABCD) and only 10 points. But get all letters and you earn an extra ball. Decisions, decisions..
At the top of the playfield there's a target that scores 100 points, and may be lit for extra balls by each row of popbumpers. Great ! So if you're good you can light both rows of popbumpers, hit this target and not only score 100 points but add 2 extra balls at the same time !
Below this target there's a hole that scores 50 points, and will kickout the ball against the 100 points target above it. Wow !! 150 points in one go - and if you're lucky the pinball will bounce back into the hole and this will repeat one or two times..
but if you're unlucky the pinball will miss the hole, come down roll down the playfield with a lot of speed, go between the flippers and jump right over the hole between the flippers and drain....
At the left and right are 5 bumpers in a straight line below each other, you have to light them in sequence. On the sides is a little lane which scores 30 points, and can be lit for an extra ball when you've lit all popbumpers of the opposite side.
As said, the 5th bumper is positioned below the flippers, and between the flippers there's another hole that will kick the pinball back onto the playfield.
That's it. No other mechanisms, no bonus to earn, ...
Just a plain add-a-ball pinball machine.
Playing this game does require some strategy - do you go for high points ? Then you're better off trying to get the ball through the outer lanes when it enters the playfield (getting 50 points instead of 10, but not getting a letter for an extra ball). And you try to get the pinball into the hole and hit the target for 100 points.
Or do you want to play for extra balls and play a long time ? Then you mainly try to get the popbumpers lit in sequence and earn letters, and concentrate less on the high scoring target..
This strategy can be dangerous however - it happened to me a few times that on my first pinball played I was able to light both yellow and red bumpers up to number 4.
But with the next pinball played you have to let it roll down quickly towards the bottom of the playfield trying to light popbumpers number 5.. with a high risk of draining - and either all of the next pinballs drained without lighting the 5th bumper, or I could light it but was not being able to earn the lit extra ball higher on the playfield.. so what looks like a simple and easy playfield layout is actually deceiving.
Next Stern game is Rolling Stones
Usually I don't announce every new Stern game here, but to follow up a previous post
(where it was rumored to be Mortal Kombat) - it's been semi-officially confirmed the next Stern game is Rolling Stones.
(semi-officially announce: not by Stern themselves on their site or anything, that they'll do only when the game is starting in production, but through distributors of them)
It's over a year there were rumours going around about a music/rock band theme.
This is one title I'm interested in.. Avatar or Iron Man didn't interest me at all, but Rolling Stones ? Not that I'd buy one but I am curious on how the theme is implemented, what songs, the artwork, game rules, ... so when one is available in Belgium I want to check it out!
Friday, November 26, 2010
Measure eos switches before installing them..
Repaired a burnt flipper coil on a Williams Grand Lizard (system 11).
The EOS switch was broken and the coil had melted a bit internally, the plunger was completely stuck.
Last year I had installed a new flipper coil on my AFM, and after installation I discovered that the coil was bad internally (one of the wires was broken) and the flipper didn't work. Had to remove the coil again and replace with another new coil, a lot of time lost.
Since then I always measure the resistance of each coil before installing it.
Did the same with this game, I measured the new coil to make sure it wasn't broken.
Switched from the old type of sys11 coil to a newer FL-11630, added a yellow capacitor to reduce the arcing so eos-switches don't wear out as much, ..
Everything done, time to test the game.. The flipper worked but went up very slow.
Hmm.. What's wrong here ? Can't be a broken coil as I checked it before installing.
When a flipper goes up very slowly (barely has enough power to go up, but stays in the up position correct), it means it's only working on hold power. So the end-of-stroke switch is not closed or not making good contact.
On SYS11 games the EOS is normally closed, it has to make contact so the flipper has full power, and when opened the flippers have less power (only to stay in the up position).
Measured the brand new eos-switch.. and.. weird ?!
Although the switch blades were adjusted correct and contact points were touching I didn't measure continuity ?! This was a brand new eos-switch, how could it not make contact ?!
It was even exactly the same replacement as the original was, same type, same size and shape, with heavy-duty contact-points.
Luckily I'm well prepared, have about a dozen different switches with me..
Took another type, an universal eos-switch (contact points are the same type but the blade is a bit longer, you can cut/bend it as you wish or add more contact points).
Measured this new eos-switch.. and.. also didn't make contact ? Only after bending the blades so they pushed against each other really good, they started to make contact (and still intermittent).
Used a bit of sandpaper to clean the contact points, and then it worked fine.
Installed this switch in place of the other, and the flipper worked fine. :)
I tested the eos-switch that I had removed; It was a brand new one, looked good, but on the contact points I didn't measure continuity when they touched eachother ?
Maybe they had corroded as I have it already a few years ?! Tried some sandpaper but that didn't help.. first time I notice this :(
Anyway, now I learned to use my dmm to measure each part before installing it, not only coils but also switches, even brand new ones !
Wednesday, November 24, 2010
Flashmob in Antwerp makes a human pinball machine
A few weeks ago I was switching channels on tv and suddenly heard something about a pinball machine. Pinball machine ?? This I have to watch !
It was on a show called T.U.C.S. on MTV.
They organised a flashmob in the center of Antwerp, to create a human pinball machine.
I immediately checked their facebook group and checked their website, but only new (3 weeks later) the episode is online.
You can watch it here: human pinball machine flashmob in Antwerp on TUCS MTV.
Thursday, November 18, 2010
changed site layout
100th post to this blog :-)
I've put a new layout of the site online the previous weekend.. Nothing major, the biggest difference is that the menu links changed from the right (inside an article) to the top of the page..
Main page also changed a bit in layout, the new articles part got bigger. I'm sure most of you guys have already noticed the pink ladies :-)
They're for the article of the Rosmalen jukebox show. I've posted a lot of pictures of pinball machines and jukeboxes.
Have to review and update most pages but that'll take some time.
sometimes it is just a fuse..
Got a mail from someone who lived nearby who has a Strikes and Spares.
The machine didn't start anymore, but he said it probably was just a fuse because two were missing. One had been removed by a previous repair guy and never returned, the other the owner had taken out to take to the shop and buy a new one, but he'd lost it instead.
So I'm loading the car with lots of things.. I like to take lots of parts so I don't need to make a return trip because I don't have a trivial part with me.
When a fuse blows there's a reason for it. So I'm guessing if the game doesn't work and a fuse had blown, there's probably a coil melted (so I bring a few), a shorted transistor, and probably also some cpu battery damage (so I take a remote battery holder and most of the ic's that are on the cpu board). And a big box of lamps and rubbers because most old pinball machines can use a new rubber set.
Arrived at the house, we go to the basement.. game is in nice shape, owner bought a about a year ago, probably from a pinball collector. Game had been rubbered and cleaned before. No battery damage and a capacitor has been installed. 2 fuses are missing. So I put new fuses in (correct amperage), and the game boots.
I play 2 games, everything seems to work fine, fuse doesn't blow, all coils, lamps and switches work, ..
Sometimes it's only a fuse..
Wednesday, October 27, 2010
Cliffy protectors in the house
Last week a small package from the USA arrived.. a set of Cliffy protectors for my Cactus Canyon !
Haven't had time yet to install them but will do one of the next days.
If you have a pinball machine of which you want to keep the playfield (especially the edge of scoops) in good condition, (or they're already worn and you want to hide the wear and prevent more wear) then these metal protectors are a must !
You can order them at several pinball parts shops or from Cliffy directly at:
CliffysProtectors.com and PassionForPinball.com
Thursday, October 14, 2010
arcade cabinet parts and custom mame cabinets
Had a friend over this week, came to pick up some parts and play pinball.
Peter also has a shop, rastermania, where he sells arcade parts.
He can also build you a custom mame cabinet.
Peter also has a shop, rastermania, where he sells arcade parts.
He can also build you a custom mame cabinet.
Monday, October 11, 2010
Next Stern game is Mortal Kombat ?
Was just checking out the Stern page at wikipedia and there someone has just added 2 days ago that their next game will be Mortal Kombat ?!
Haven't heard any confirmation about this, i'm curious if this will be true..
MK was rumored but so is Tron as a theme.. but if it's on wikipedia it shouldn't be just a rumor ?
Haven't heard any confirmation about this, i'm curious if this will be true..
MK was rumored but so is Tron as a theme.. but if it's on wikipedia it shouldn't be just a rumor ?
Friday, October 8, 2010
CV standup target replaced
I intend to log all repairs I do to my games here, no matter how small they are..
writing down all repairs is a good thing to do if you own a few games, as you can't remember all details of what you did in the past, and sometimes it's very useful to know you had a similar problem before with the specific game (see my MM / AFM cpu problems).
A few operators I know keep a repairlog in each game that notes what had to be repaired. (especially when more than one person repairs the games this is a very good thing to do, to keep track of the specific issues and weak points of a machine).
Anyway, my repair of this week was replacing a yellow standup target on my Cirqus Voltaire pinball machine.
The yellow standup target left of the ringmaster was broken, the yellow plastic tab had just broken off, clean right above the playfield.
It's the first time I have a broken target on any of my pinball machines..
Some games I bought with broken targets and I can imagine that in commercial use they get a lot of abuse, but never had one break at my house.
I don't know when or who did it, we had a pinball party a few weeks ago, and later a few friends have also come over and played the game..
no-one had notified me of the broken plastic :-(
Only when I cleaned and waxed the playfields of all my pinball machines I noticed this damage.
Easy thing to replace you'd think ? Just unsolder 2 wired, remove 2 screws, and replace the target with a new one.
Well, that was the plan. In reality it wasn't that simple.
Being so close to the ringmaster assembly, the whole metal cage of the ringmaster was in the way. I really didn't want to remove this huge assembly, so had to be a bit creative (and had to use a very short nut driver).
Desoldering 2 wires ? No, 5 wires. Seems both yellow standup targets are wired up parallel, one tab had 2 wire and the other 3. So desoldering and resoldering was a bit more tricky..
Finally I wanted to screw the new target back in place. Aaaaargh.. even though I'm pretty sure it's a NOS Williams standup target, screw holes were just a little bit smaller than on the broken target. The thick screws didn't fit very well, I had to force them into the metal tab first, and only then screw the whole part into the wood of the playfield.
What I thought would take 15 minutes took about 3 times as long in the end..
Thursday, October 7, 2010
I have an ultrasonic cleaner
When we visited Henk de Jager to drop off our Gottlieb Majorettes pinball machine (see post here a few weeks ago), we talked about cleaning and restoring pniball machines and exchanged some tips.
I had cleaned the playfield and tumbled all metal playfield posts and screws so they were clean and shiny. Henk and Ramon showed me a similar Gottlieb woodrail they were restoring (which is going to be for sale at the next Rosmalen jukebox show btw).
They had also cleaned the playfield posts on their game but did not use a tumbler.
Instead they showed me their ultrasonic cleaner and explained me a bit more about how it worked. I've heard about these machines before (I know some collectors who already use them for a few years) but never had a detailed look at how they worked and how the results were.
Well I was convinced by the results !
They bought theirs at Conrad, where they have a few different models for sale.
Nikky must have seen me look too interested at their ultrasonic cleaner, so imagine my surprise when a few days ago the postman brought me a large box !
She had done some research and bought me this ultrasonic cleaner.
An early present for our wedding anniversary that's coming up in a few days !
Thank you honey !!
Haven't been able to test the machine a lot, but once I have some more results I'll make an article about it..
where to buy electronic components
New article online:
buy electronic components to repair pinball machines.
I made a list of useful tools and electronic components available for sale at
Conrad.
buy electronic components to repair pinball machines.
I made a list of useful tools and electronic components available for sale at
Conrad.
Sunday, October 3, 2010
Space Invaders carpet

Just copied some pictures from my phone over to my pc and found this one I took a long time ago.. went shopping with Nikky in a furniture store and saw these cool Space Invaders carpets. Cool eh ?
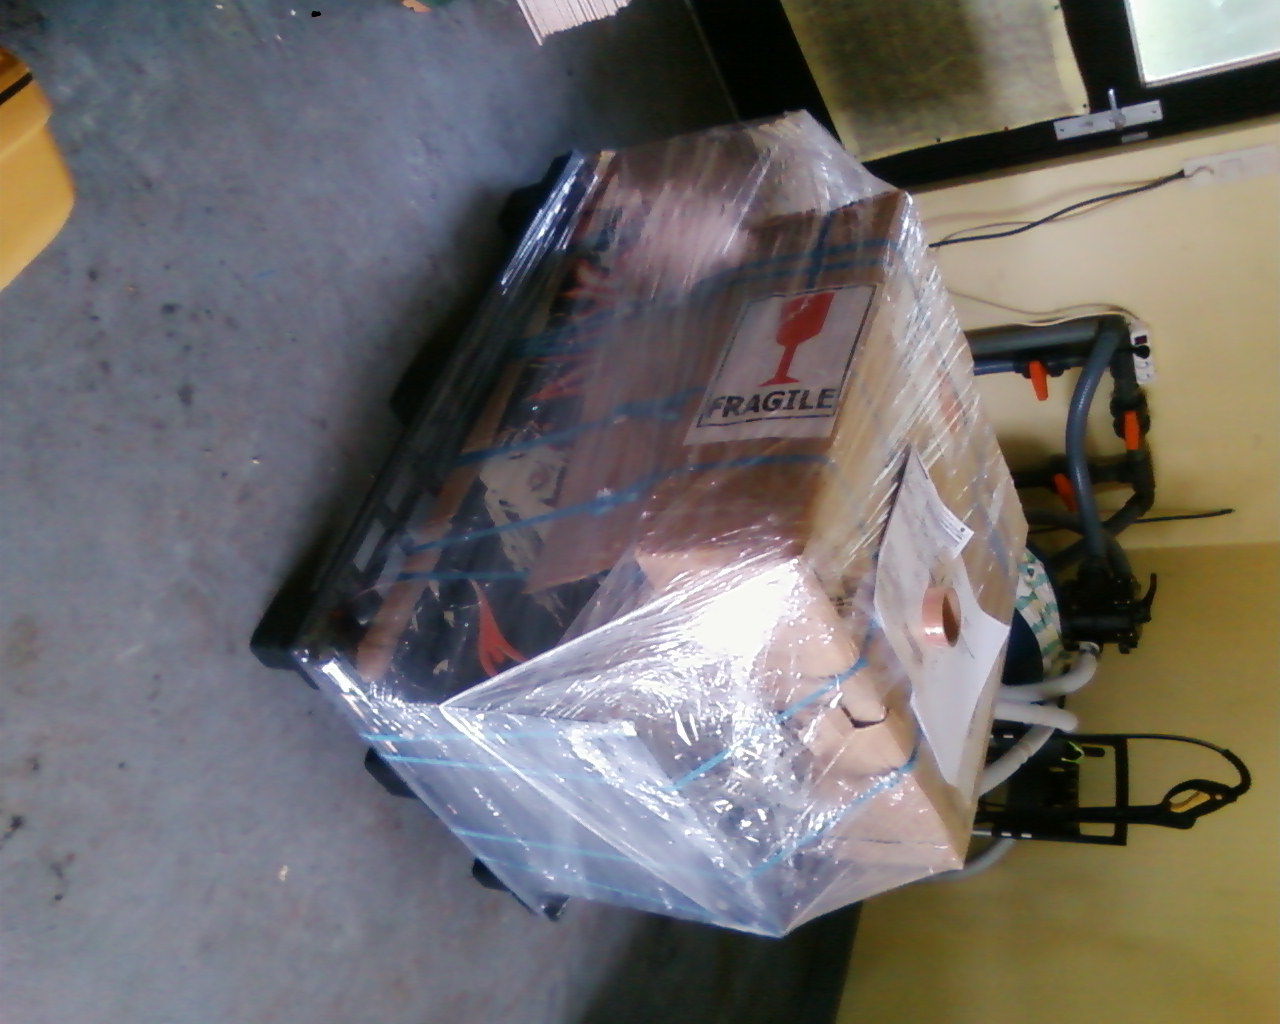
Spooky ready for transport
I'm not a pinball dealer. We don't have games for sale. We just want to help people.
And the problem is we always say yes if someone asks us something.
So when we were contacted about a month ago by someone from the USA if we could help to arrange some shipping for someone who bought a game in the Netherlands, we said yes. How hard could it be ?
Find a shipping company that picks up the game and ships it to the usa, easy, no ?
Well, not really. The seller didn't really want to cooperate (just open his door and let someone pickup a game, but no palletting or anything).
So in the end we drive ourselves to the Netherlands to pick up the game.
But then it's for 2 weeks in our living room (no space to store it somewhere else) until it's driving Nikky nuts. Contacted a lot of shipping companies, almost no-one wants to do it. Most even don't bother to reply us. Finally we found someone who will do it. Not cheap but there aren't alternatives. The buyer in the usa gave the order to the company, now we have to prepare it for pickup later this week.
Problem is we don't have a garage at our house, so we had to bring the game to someone elses house where it can be picked up.
It needed to be set up on a pallette. Problem is, a regular euro-pallet won't do for shipping to the usa, the wood has to be fumigated (like for shipping to Australia). Another problem we didn't know about. So last thursday we ordered a plastic pallet.
This arrived in time, and today we've wrapped the game onto the pallet. A lot of cardboard, about a mile of plastic straps, and finally coccooned the game in plastic wrap. Took us about 2 hours. Now it's ready for transport, byebye Spooky !
Sunday, September 26, 2010
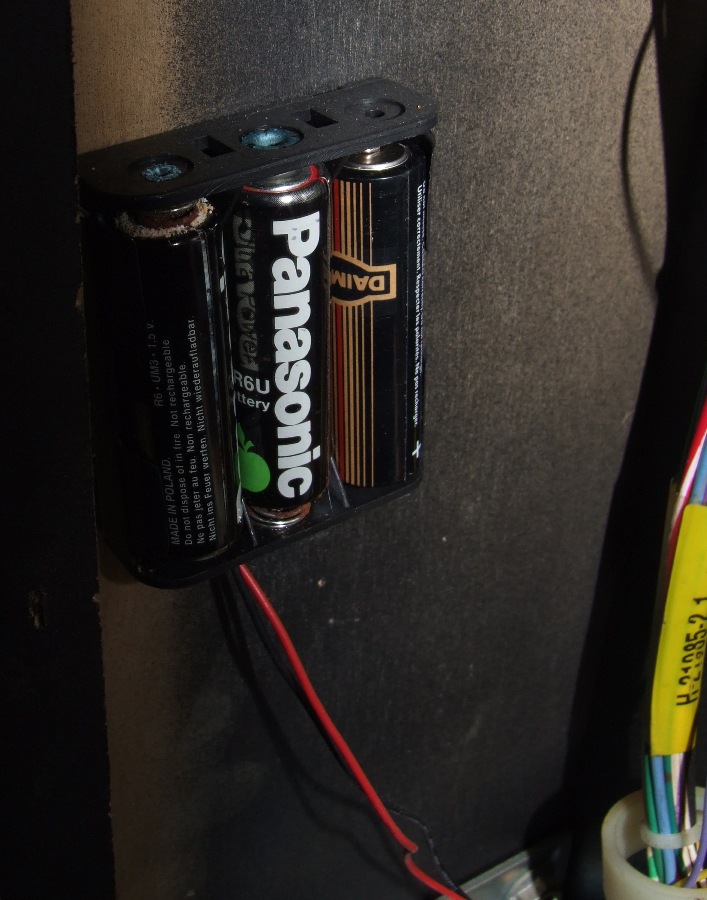
install remote battery holders
I've posted about it already a few times the past months, but non I experienced it myself - leaked batteries !
My Cirqus Voltaire pinball machine showed a 'factory reset' message a while ago..
A few days later it started up without any problem. Still I was curious what caused it, probably time to replace the batteries I thought.. I don't replace them every year, but as they're all in remote battery holders I'm not afraid. But up to know I never had a problem myself with leaked batteries.
Well, this morning I finally opened up the backbox and I was amazed to see the condition of the battery holder.. the batteries had leaked !
I'm lucky to have remote battery holders installed.. I really do not want this mess over my expensive cpu board !
Saturday, September 25, 2010
Orbitor One repair
At the end of our pinball party this summer, my Orbitor One developed a problem.
Locked balls would not be ejected anymore.
Probably a bad coil or loose wire I thought, I just switched off the game as it was near the end of the day.
Hadn't looked for a while at this game since, because a friend of mine had bought an Indiana Jones and wanted to shop and redecal it but didn't have room to do this on his appartment. So this Indiana Jones came to our gameroom, he took the playfield out to work on it at his place, and do the cabinet at our place.
No problem, he promised it would be done in about a week.
The first week he did come for a day or 2 to remove the existing cabinet decals.. but then the cabinet just stood there. All stripped parts of it were laying on top of Orbitor One's playfield glass.
What was going to be one week became almost 3 months.. 2 weeks ago the cabinet and associated parts finally left my gameroom. Time to look at this Orbitor coil problem !
None of the coils worked, replaced a fuse underneath the playfield. Game worked again but the fuse blew when the upkicker coil was activaed.
The upkicker coil did look a bit burnt, the wrapper was a bit brown.
Coil was bad I thought, so I'll just replace it.
That was easier said than done. Seems it's not a common coil, it's a little bit smaller than regular coils (like used in slingshots and other assemblies).
So while I had coils with the same wiring/turns, they didn't fit physically.
After searching through all my spare parts I finally did find a coil that was identical.
Removing the assembly was also not easy. You see, the Orbitor One playfield is built up in several layers. At the bottom there's a large piece of wood where most assemblies mount on to. Then there's the molded and painted plastic and on top the curved clear plastic. The assembly I needed to remove was mounted onto the wooden part but the top part of it (where the ball rests on, with switch to detect the ball goes all the way through the plastic playfield).
Furthermore, the assembly may be totally at the edge of the playfield (and you can reach it well when the playfield is raised out of the cabinet), the screws are all mounted on the inside. So when you stand on the side of the cabinet it's difficult to reach the screws.

You have to raise the playfield in vertical position and reach it from the bottom side, but then you can't see what you're doing as you're working through a hole in the bottom wood board.. aargh.
After a while I was able to remove the assembly and replace the coil.
Worst thing of all, the old coil looked a bit burnt but when I measured it's resistance, it still turned out to be fine. Weird.
Replaced the fuse under the playfield (as that was blown). Swithed the game on, played some games, suddenly the fuse blew again ?!
Replaced it again, and now I clearly saw what the 'slow' type of fuses do - because when I switched on the game I immediately saw the wire inside the fuse glow, but the fuse didn't blow.
Anyway, continued testing the coils, played a few games, activated a lot of coils together (let the drop target banks reset simultaniously).
The game works fine, the fuse didn't blow anymore.
I have no idea what cause this fuse to blow.. maybe some other part may be at the edge of breaking down, but it wasn't the coil I replaced.
I'll see how this game behaves in the future, if the fuse blows again or if something else breaks..
Friday, September 24, 2010
MM and AFM cpu problems
A few months ago I had a problem with my MM. Suddenly it started to reset, hang, didn't boot, .. all kinds of weird problems :(
I had recently installed a new gamerom (the latest version, ordered from thatpinballplace.com ). But it started correct, to be sure I tried my original gameroom in it too, no difference, same weird behavior.
When I pushed in the connector at the right side (delivering +5v power) it had some effect. Sometimes the game didn't boot at all, when I played with that connector it did start. Weird..
Played a bit more with it, switched the cpuboard with that of my Attack from Mars.
Suddenly the problem was gone ? MM booted correct, AFM also.
I was happy as it was just a few days before I had a pinball party, so I really wanted these two games to be working and didn't have time to investigate (or order parts).
It's a good thing I write down here some repairs I do, as I had forgotten that I had problems with these cpus one year ago. But here in my blog I found a post about it, AFM then had weird problems and I finally switched the cpu board with that of MM and the problems were solved ?
So now the boards are in their original games again.
I've been testing a bit more with the cpu board and I think somewhere there's a bad connection on the board. It's not the connector itself as I first suspected, but it's somewhere on the middle right side of the board, because if I tighten the screws a bit more or less the cpu also gets problems.
I didn't have a tool to extract an asic so I couldn't rule that out as a solution.
Now I've finally ordered one from
dealextreme, but I haven't used it yet. (as the cpu works fine in AFM and I go by the 'don't fix it if it ain't broken' motto..)
When I have some time I'll extract the asic from the board, put it back in, and play a bit with the board to see if it always boots..
Thursday, September 23, 2010
Cyclone sound repair
We moved some games around in the gameroom the last days. The room now looks a bit bigger (all games with wide heads are on one side, and some WPC games and Safecracker are on the other side next to the diner booth).
The diner booth and table are now in the middle of the room instead of in a corner where it alway was. It definitely is an improvement.
Finally I was able to set up a Cyclone. I have it since 2 months already, got it especially for my daughter as I think she will like the theme very well, but it was all this time in the living room of our house as I didn't have space to set it up on its legs.
Cyclone starts a game and plays, needs to be shopped. Only technical problem is that game had speech but no music.
Yesterday I finally had a look at it. Pinrepair.com guides don't have a lot to say about repairing system11 sound/speech boards :-(
Don't have schematics so I couldn't investigate it deeply (and start measuring signals at specific components). Unplugged the socketed ICs, put them back in. No change.
Finally I reseated the ribbon cables. Bingo ! Cyclone suddenly does have sound !
I'm happy :) The game is so much more fun to play now.
Cleaning this game will be another big task. It has a mylar on the playfield but it's bubbling, and removing mylar from non-diamondplayed games is always dangerous to do..
I'm not in a hurry though to shop it.. although I had bought this game especially for my daughter, since then we have bought a Cactus Canyon (and that was set up immediately in the gameroom). She just loooooves CC ! She has played it every day since we bought it, knows all the sounds, just loves it when she is able to start gold mine multibal (the neighbours hear her yell along with the game).
I'm afraid she won't like Cyclone much when I finish 'her' game and still prefer CC.. but how would you be, if you could chose between Cactus Canyon or Cyclone ? :-)
Gottlieb Majorettes gone for repair
2 weeks ago we brought our Gottlieb Majorettes (I have posted about this game before) to Henk de Jager in the Netherlands.
He's a very skilled pinball repairman who even creates his own custom e-m pinball machines !
Henk will repair the Majorettes, cut away all the added/hacked wiring and bring it back into original and working condition. I can't wait to see how it turns out and play this game !
We also had the opportunity to see his personal collection (he has some very nice and rare games), it was fun meeting and talking to him again (usually we only see him once a year at the rock-around-the-clock jukebox show).
With their company, Henk and Ramon can repair electro-mechanical games for a very reasonable fee, so if you are in Belgium or the Netherlands and have an e-m game you cannot restore or repair yourself, he may be a solution. Let me know if you want his contact information.

Sinbad repair
Will post some more info about repairs so other people can learn about them (as pinballninja.com advises).
Repaired a Sinbad. Gottlieb System 1, I had never worked on this type of game before.
Prepared myself by reading the pinrepair.com guide for this type of game, and checking my spare parts boxes to see what I had laying around for this type of games (coils, a driver board, ..).
The pinball machine was in quite good condition. It had only been on location for about 3 years and then always in home use. Needed a good cleaning, new rubbers, some lamps.
It played very slow, that was mainly because the playfield wasn't raised enough.
I raised the back legs, adjusted the gaps of the popbumper switches, and the game came alive.
One of the right flippers was too weak, eos needed to be cleaned and adjusted.
One problem was that the chimes did not work when you scored points. The game was very boring without this instant feedback when you're playing well. Most of the charm of playing these old games is the constant ringing of a bell or chimes when you score points.
Only at startup of a new game the chimes did make a little sound.. So the fuses and coils were good. It had to be something on the cpu, couldn't be anything else..
Took out the manual, sure, there's a dipswitch to select if you want chimes when you score points or not (dipswitch 20 if I remember correct). Weird enough it was already set to 'on'.
Set the dipswitch to the 'off' position. Still no chimes. Turned it back in the 'on' position. Bingo ! There it was, working chimes during gameplay.
Seems the dipswitch didn't make good contact anymore, moving it had solved the problem again..
Another problem was there were no playfield lights. Had measured all fuses, they seemed ok. Read the part about the playfield-relays (Q and R if I remember well). Operated them by hand, still the lamps didn't turn on. Measured voltages, didn't have any. No broken wires so it had to be something with the fuses.
After a while I removed the fuse from the fuseholder, measured it again.. and it was broken afterall !
Replaced it with a new fuse and the playfield lights came on nicely :-)
Now I know why you should always remove one end of a fuse out of the holder and not test them still in position.. there's 20 minutes of my life wasted :-(
Monday, September 20, 2010
where to store your keys
I learned today not to store my pinball keys in the coin return box of a coindoor..
Usually I just leave the keys on the game in the lock. This works for all my games.
But on my Cactus Canyon, there's a lock installed with a round key. The problem is that the key pops out when the lock is in the locked position. So I had to search for another place to store that key.
My first idea was to put it in the coin return box of a coindoor. Behind the metal plate it's hidden out of view, and you can easily reach it when you need it.
I'd seen some other collectors also store their keys in that place.
When I wanted to lower the volume on Cactus Canyon earlier this evening, I discovered my idea to store the key in the coinreturn wasn't that good..
I have a big box of tokens, and my daughter likes to drop coins in the games.. even when they're switched off. So I had a coinreturn that was filled with jammed coins.
Had to remove them one by one until the metal plate could be moved back enough to remove the key and the rest of the tokens..
Wednesday, September 8, 2010
did Stern become Gottlieb ?
I have to admit I don't often play new Stern pinball machine. Wait, make 'almost never'. Lost interest a few years ago in them, and even while I can visit the local Stern distributor when a new game has arrived, I almost never do. Last time I went there to write a review of a game was for the Stern Grand Prix pinball machine.. so that's many years ago..
I did visit this dealer later when Wheel of Fortune and BDK where new, but didn't bother to write a review (as other sites like pinballnews are faster and write a more in-depth review that I could do after playing two or three games on a brand new machine). A while ago I also played a few games on a brand new Iron Man machine, but I was always more checking out things on the playfield (what to shoot for, how's the artwork, ..) than ie looking at the display.
Anyway, this weekend for the first time in many years I went to a local pinball competition. It was organised in a very impressive looking gameroom, with a sweet setup of games. I hadn't entered the competition so was playing for fun on a few of the latest Stern games (there was Iron Men, Batman Dark Knight and Spiderman next to eachother).
After playing IM and busy playing BDK, my brain finally started to work.
Wait.. all these games have a red display and not the regular orange dmd displays as we're used from Williams/Bally.. and those fuzzy animations, movie clips that have been captured and playback very badly on a red dmd.. I've seen this before !!
I've had a game like this many years ago, a Gottlieb World Challenge Soccer ! During gameplay it would show movie clips (of a soccer player passing a football, scoring a goal, ..) in a really crappy digitised format.. WCS isn't the only game, other Gottlieb games with dmd's had this too..
Stern has been doing this for a few years already, don't know how it comes I only really noticed last weekend how similar it is to what Gottlieb had been doing all time.
Thursday, August 19, 2010
remote battery holders
I've started again to make remote battery holders. Easy plug-in type, no soldering or other technical knowledge is required. 8 euro each.
Protect your expensive game from damage because of a leaked battery !
Many people don't know this but every electronic pinball machine has some kind of battery in them. Because of age (as the batteries have never been replaced) but also because of a malfunction, they will start to leak and do irrepairable damage to your mpu board (making your game break down - and it may be an expensive repair to get the game working again). Usually when your pinball machine does not start up anymore it is way too late already to repair it..
The last months I've seen more and more games with leaked batteries.. so be careful.
Until a few years ago I didn't see battery damage a lot. When I saw it, it was usually because of a bad battery or technical malfunction, and only 1 had started to leak (sometimes only a few months after it was brand new installed).
As most WPC games are not getting 15 to 20 years old, those batteries installed from the factories all have had their best time and start to leak. All three batteries leak, first only the battery holder had some corrosion on the contacts, but if you're not quick to detect and repair this, the damage will spread to the ics on the cpu board itself.
So if you have a Bally / Williams game with a dmd (or older 80ies game), replace the batteries and install a remote battery holder to prevent a costly repair in the future !
Back from holiday
Back from holiday, time to start working on pins again.
Removed all top parts from the Gottlieb Majorettes, will clean the playfield. Then it'll go to Henk De Jager for technical repairs, he'll put the game back in original condition (remove all the 'extra' wiring) and get it working again :)
Can't wait to play that machine !
Took most parts off the playfield (still need to desolder and remove the bumpers), gave the playfield a fast cleaning (to remove all dirt on the surface) and still need to use a polish to make the playfield shine and really clean.
Our pinball fridge is for sale.. we need to make space in the gameroom. So if you are in Belgium or the Netherlands and need a cool retro fridge for your pinball gameroom, let me know..
And I finally have to clean up the gameroom as now it's totally a mess.. a lot of toys where my daughter plays with in the garden are in there, there's an empty cabinet (and all the hardware of it) from an IJ of a friend that he'll redecal at my place, and much more..
Friday, July 30, 2010
new custom pinball machine for Metallica
Added Beatniks Koolsville to my list of custom pinball machines, it's a conversion of Elvira and the Party Monsters, commissioned by James Hetfield
Monday, July 19, 2010
New Stern pinball machine is Avatar
Friday, July 16, 2010
Gottlieb Majorettes restoration
We bought a gottlieb Majorettes pinball machine recently. It's a wedgehead, one-player electro-mechanical pinball machine made in 1964. Pretty rare, very beautiful and fun to play. We're very happy with it as we wanted an old game like this for a long time.
It's condition is something we're not so happy with, it doesn't work and it's been hacked, a lot of wiring and relays have been added. Currently I have no idea what most of these do..
Made a page with pictures of my Gottlieb Majorettes pinball restoration.
I'll update it and make new pages when I continue working on this pinball machine.
Thursday, July 15, 2010
italian pinball championship
New article online about our trip to Milano and TIF: italian pinball championship.
We had a good time, although the trip itself (especially the drive back) was exhausting.
We had a good time, although the trip itself (especially the drive back) was exhausting.
Friday, July 9, 2010

Thursday, July 8, 2010
pinball calenders for sale
I still have some italian pinball calenders for sale.. 5 euro each.
One page per 2 months, each time one of the models with a pinball machine (MM, SS, CC, ..)

One page per 2 months, each time one of the models with a pinball machine (MM, SS, CC, ..)

Sunday, June 27, 2010
Italian pinball championship
I'm preparing for the Italian Pinball Championship that's in Milan next weekend.
We're going ! Hope to see you there ?!
Heres more info about the italian pinball championship.
We're going ! Hope to see you there ?!
Heres more info about the italian pinball championship.
Thursday, June 24, 2010
History of Stern Orbitor One
I'm very excited about this new article: the history of Stern Orbitor One.
Orbitor One is a favorite game of mine. It's unique with a 3D playfield, quite rare with its low production run, and very different to play.
Not much was known about this game (only that it was not developed by Stern Electronics themselves). So when I got in touch with someone who worked on the game in its development, I really was excited !
The history of who was behind the game is very interesting - in fact when I first read it, the story sounded too unbelieveable and too fantastic, for a moment I even doubted if it was real or a hoax.. but when I started to dig in the history and could confirm some facts I was even more amazed.
At the same time I've changed my Orbitor One game review, as after all this time it still didn't have any pictures.
So I quickly made some various pictures and added it to the gamereview, hope it's even more interesting now.
Wednesday, June 23, 2010
how to open and repair a Tomtom One gps
Our TomTom One GPS broke yesterday.. still worked but because it fell down too much onto the dashboard of the car, the usb-slot just broke off. So I could now charge my gps anymore.

as you can see the usb slot is just gone, there's a hole ?!

The Tomtom One case is secured with hx8 screws. They are star-shaped.
Luckily they are no problem for me to open, a few years ago I bought a set with all types of tamper-proof bits :) It has saved me a few times already and paid back itself because of all the things I was able to fix with it.

The plastic parts click into eachother. Even with the screws removed, they will not come apart. Put a sharp knife between them. Apply some pressure and they come apart.

Now you can open the case. You see the metal part that broke off from the pcb board.

As you can see I also disconnected the wire that comes from the battery.
The GPS unit is powered all the time (and in standby), I really do not like to solder on pcb boards that have power on them. So to be sure I disconnected it.
Soldered the usb thing back in place. It is held in place by 4 small tabs that needed soldering. The data and power is transfered by very small connections that also broke off. Checked the mini -b usb specifics at wikipedia, power and ground are the outer 2 pins of the 5. So I soldered these two (don't need data as it was difficult to solder with my soldering iron and I don't connect the gps to my pc).
Assembled the Tomtom again, tested it and the gps unit started up correct (and charges) ! I've repaired my TomTom One gps ! :-)

as you can see the usb slot is just gone, there's a hole ?!
The Tomtom One case is secured with hx8 screws. They are star-shaped.
Luckily they are no problem for me to open, a few years ago I bought a set with all types of tamper-proof bits :) It has saved me a few times already and paid back itself because of all the things I was able to fix with it.

The plastic parts click into eachother. Even with the screws removed, they will not come apart. Put a sharp knife between them. Apply some pressure and they come apart.

Now you can open the case. You see the metal part that broke off from the pcb board.

As you can see I also disconnected the wire that comes from the battery.
The GPS unit is powered all the time (and in standby), I really do not like to solder on pcb boards that have power on them. So to be sure I disconnected it.
Soldered the usb thing back in place. It is held in place by 4 small tabs that needed soldering. The data and power is transfered by very small connections that also broke off. Checked the mini -b usb specifics at wikipedia, power and ground are the outer 2 pins of the 5. So I soldered these two (don't need data as it was difficult to solder with my soldering iron and I don't connect the gps to my pc).
Assembled the Tomtom again, tested it and the gps unit started up correct (and charges) ! I've repaired my TomTom One gps ! :-)
Monday, June 21, 2010
more custom pinball machines
A week after the interview with Greg Freres, I have even more custom pinball machine news !
Dominique John has created Galactic Girl, a custom electro-mechanical pinball machine.
I have also added an overview of all custom pinball machine projects. Dozens of pinball collectors have created (or are still busy) making custom pinball machines.
Follow my site/blog, as within a few days I have a really very interesting article !
Don't want to post more yet (people who follow me in facebook will have read what it's about though), but it's really going to be a very interesting article about the history and development of a unique game..
Saturday, June 19, 2010
new flipper rubbers and pinball rings in stock
Got a lot of new pinball rubbers in earlier this week.. almost didn't have any rings anymore in some sizes. Had them at a good price too :-) Let me know if you need a new rubber set for your pinball machine..

Friday, June 18, 2010
Bought a new strobe
Not pinball but photography related (you may see more of these posts here in the future), they're kind of pinball related as my pinball machines are often subjects of what I photograph.
Anyway, I'm happy, bought a new toy :)
Got myself a Metz 48 AF1 strobe. I'm happy with it as it's a great strobe (as far as I've tested). Does full TTL, which I didn't have - up to now I only had a Nikon Sb-26dx which couldn't do ttl with my D90, and two older strobes with a slave flash trigger that only had full power or their own optical eye.
So with the 48AF1 and that SB26 I've got myself two nice flashes with full control in manual mode. Now I have to find some time to play around, but I already have some good ideas :)
I had been considering the Nikon SB-600 too, as that's similar in features. It is a bit more expensive here in Belgium (seems in the USA it's opposite and the Metz unit is more expensive there).
Read a few reviews of both flash units before making my choice.
The main difference between them in my opinion is the number of buttons on them.
The Metz 48 only has 4 (and a power on/off switch).
- Mode (switch between manual/ttl/ttl bl/hi-speed sync/..)
- minus and plus button
- testbutton
that's it !
With the flash on your camera you can select with the mode button between ttl and manual (and then use the + and - buttons to adjust power).
All other settings you have to press + and - together to go into a selection menu.
There you can select several items (again using +- together, and selecting with only + or -). Ie you can set it to use as a slave (and set its channel), adjust the zoom manually, modeling light, ..
The SB600 unit has much more dedicated buttons for each of these functions.
The advantage of the Metz is that it looks easier (less buttons to learn).
The Nikon SB-600 has an advantage for the pro photographer, it's much faster to make an adjustment: just press its specific button. While on the Metz you'll lose a few seconds more because you have to go into the menu, go to the adjustment, change it.
Especially when you're shootin people this is a big advantage, they'll barely notice that one press with the Nikon and the shoot goes on. With the Metz you have to stop for like 2-3 seconds before you can continue.
But as I only shoot static objects in a studio setting, speed of making adjustments it's not my main concern.
One advantage the Metz has and which is why I really like it for, is that the lcd screen lights up automatically. Press any button and the lcd screen lights on.
The SB-600 doesn't have this, it has a dedicated lcd backlight button.
I really do not like this. My older Sb-26dx strobe is similar.
When I take pictures of my pinball machines, it's usually late in the evening, and it's very dark in my gameroom. Dark enough to almost not see anything, at least not see what's on the lcd screen and most of the time even impossible to see where all the small buttons on the flash unit are.
So therefor I really prefer the Metz, just press any button (and because there are less, it's easier to feel which one I need to press), the lcd lights, and I can do the modification I want. With the sb-26dx I had trouble doing this - I wanted to make adjustments, lcd stayed dark, couldn't immediately find the button to light it, ..
Of course now I have TTL it's easier to do this. I don't have to work full manual and adjust settings there, I could use TTL and change the flash strobe power settings on the camera instead of on the flash unit (although working full manual gives me moer control)
Wednesday, June 16, 2010
Interview with Greg Freres online
Been a while since I posted here. But that's normal wit me - my pinball is a hobby with ups and downs, sometimes I'm very active and sometimes I don't do a lot for months..
I've put a new article online, an interview with Greg Freres about the Whizbang Pinball project he's working on together with pinball designer Dennis Nordman.
Dennis is one of my favorite designers (I really love Whitewater !! and many more of his games) so I really am very interested in their project and ideas.
Whoa Nellie Sweet Juicy Melons is the first game they are customising, it's an electro-mechanical game they provide with a totally new art package and layout.
Tuesday, March 16, 2010
wall flipper game
Made an article about a Wallflipper game I had in the past.
Sold it after it was too long in storage :(
couldn't get it working as a cpu board was missing.
Now I learned more I would use an Arduino board as controller.
Sold it after it was too long in storage :(
couldn't get it working as a cpu board was missing.
Now I learned more I would use an Arduino board as controller.
Thursday, February 18, 2010
pinball cut in half
Added a picture to http://www.flippers.be/basics/101-pinballs.html
of a pinball cut in the middle. Cool to see the inside, I always thought they were of the same consistency, looks like they are two different grades of steel around eachother ?
of a pinball cut in the middle. Cool to see the inside, I always thought they were of the same consistency, looks like they are two different grades of steel around eachother ?
Monday, February 15, 2010
More custom pinball machines
Interview online with Ben Heck of Benheck.com who's making a custom pinball machine.
Also interviewed Jeri Ellsworth about her custom pinball machine.
Can't wait to see the final results of both !
Also interviewed Jeri Ellsworth about her custom pinball machine.
Can't wait to see the final results of both !
Tuesday, January 5, 2010
flame polishing updated
updated the flame polishing article..
added a link at the bottom to a professional company that creates flame polishing tools.
added a link at the bottom to a professional company that creates flame polishing tools.
Subscribe to:
Comments (Atom)

