Here's an overview of articles I put online the past weeks:
Use an ultrasonic cleaner to clean plastic and metal parts. I bought an ultrasonic cleaner a while ago. Now finally used it to shop a pinball machine and I'm amazed how clean parts come out! This is by far the best tool to buy (it's more useful than a tumbler) when you're cleaning pinball parts. Almost every part comes out sparkling, shining and looking brand new!
Golden Years show in Wieze
It had been a few years since we had visited this show. As it's in 2011 the only show in Belgium we visited again.
Add a real knocker coil to Cactus Canyon. To save costs, CC doesn't have a real knocker installed but the knocker sound is played through the speakers. It's easy to wire up a real coil.
Update to the hidden artwork on playfields.
What to do when you get the Factory Settings Restored error message on your pinball machine.
Repair damage caused by leaked batteries.
How to level a pinball machine and adjust the playfield angle.
More information and history of the Capcom Big Bang Bar pinball machine and its reproduction.
Thursday, April 28, 2011
pinrepair has been replaced by pinwiki.com
Most people will probably have already heard it, if not they've probably noticed it by now: most of the game-specific repair guides that were at www.pinrepair.com are gone.
A new site has been launched to replace its role: www.pinwiki.com
Feel free to contribute to articles if you have specific information to contribute..
I intend to finish some technical/basics articles that I started a while ago for my site. Up to now I focused on the basic things and never wrote anything more technical/documenting specific repairs and troubleshooting, as everything you had to know was available on pinrepair. That will change now.
I'll also document more repairs I do to my own games - sort of like the pinballninja blog was, as that blog is also gone.
Just don't expect me to document 500 repairs a year.. :-)
Readers of this blog that do interesting repairs may also submit them to me so I can add them..
Wednesday, April 27, 2011
Tron is confirmed as next Stern
It seems Tron is confirmed as the next Stern pinball machine, from what a Canadian distributor has posted. It should go for sale in May.
Our TRON pinball puts the players in the middle of TRON movie and
video game action battles. This is a fast moving game. TRON has 3
flippers, including an upper flipper to shot one of the two fabulous
fast action ramps. We have not utilized a 3rd flipper in a while, and
players will enjoy it. In the center of the playfield, near the top,
there is a motorized 3 bank target assembly the player must hit and
lower, to gain access to the illuminated, motorized spinning disc,
representing TRON's Identity Disc. The spinning disc shoots the ball
randomly across and around the playfield. Ramp shots take the player
to an exciting Light Cycle multiball. The player shoots at the
miniature TRON video game to start exciting features and collect big
points.
Monday, April 25, 2011
stuck pinball

Got a friend over last week, he was playing on Cactus Canyon.
Suddenly the pinball got stuck, in quite an original place.
The pinball bounced off the Bart hat and got stuck behind the flasher on top of the lost mine. We had to remove the glass to remove it.
Luckily the lost mine plastic wasn't installed because it may not have survived this..
Yesterday I had a similar experience. My new boulder plastic was installed. The pinball rolled over one of the droptargets, just as it went up. The pinball was catapulted into the air and slammed hard into the mountain plastic. Luckily it survived well :-)
Thursday, April 21, 2011
Funhouse repair
Fixed my Funhouse a few weeks ago already, only now have time to move pictures from the camera I keep in the gameroom and blog about this repair.
When I bought this Funhouse pinball machine it didn't work completely, Rudys mouth didn't stay open.
The mouth would open and close correctly during gameplay, as Rudy speaks to you when playing a game. But when you're in multiball then the mouth would not stay open. You couldn't lock your 3rd ball to start multiball. And there's no fun in the Funhouse if you can't start multiball !
I noticed a few teeth of the gear were stripped. When I bought the machine I thought this was the cause of the problem - the stripped teeth made the mouth close again. Replaced it with a new gear I had around.
To my amazement this did not solve the problem. When you lock 3 pinballs, Rudys mouth still closes again.
Did the selftests but didn't immediately notice anything wrong. During selftest the mouth opens and closes correct ?
Started to think about it (and thanks to a reply on RGP) it finally hit me - there's also a small pcb underneath the playfield which is involved in controlling the motor and its direction. That had to be the culprit.
Took out the pcb, measured every component, transistor, and all looked ok.
There was however a jumper wire connected on the input pins which shouldn't be there.
2 pins were jumpered together ? According to the schematics these were individual input pins.
Removed this extra wire. This was probably the source of my problem and why the gear had stripped - because of it the motor always ran in one direction ?
Put the pcb back in, suddenly it didn't work at all anymore. The mouth stayed closed.
What could it be ? I knew it was working before so the pcb should be ok.
Looked again at the pcb. Tested parts.. spent too much time measuring every transistor and resistor on it again. Looking to the solder side of the pcb it was obvious repairs had been done to it and a few components had been changed - but as far as I could measure these were now working well.
Checked the schematics, thought about this extra wire.. suddenly I noticed on the connector that went to the pcb, there was a wire missing !
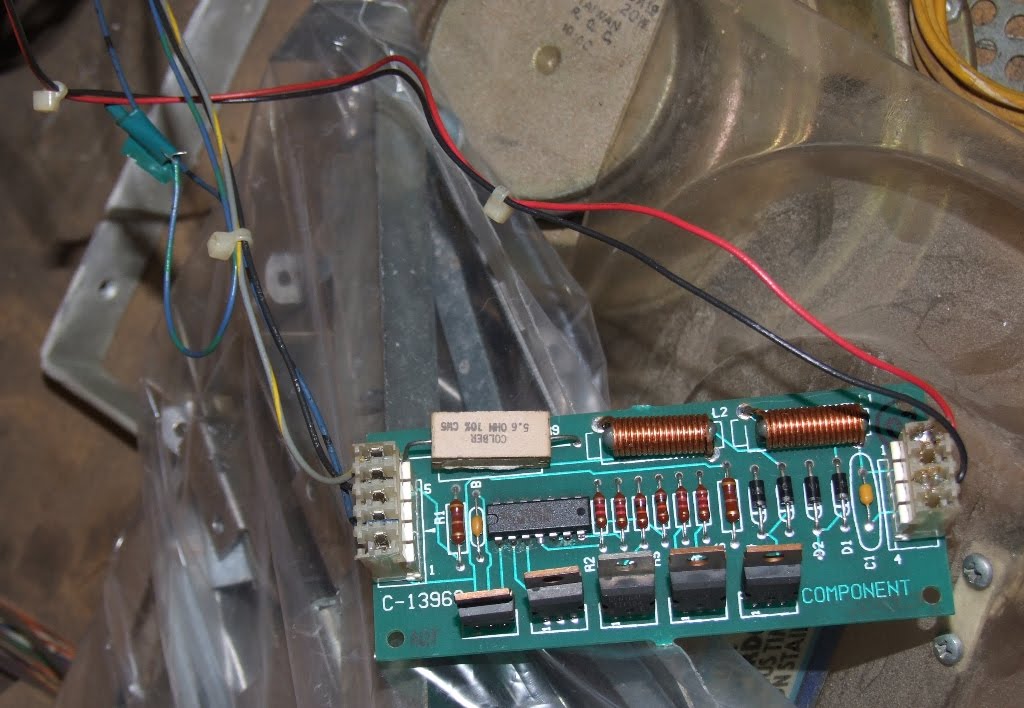
You can see it in the below picture: at the very left side, one blue wire is bent backwards and it's end is nicely tucked away with some electric tape:

I attached the wire again to the connector and now Rudy works completely like he has to !
In the photo it's easy to spot, but that's because the pcb is hanging loose.
Normally it's attached in the very back at the bottom of the playfield. Because the playfield only rotates up (and doesn't slide forward like on more recent WPC machines) you really have to bend inside the cabinet to see it, and this wires are half hidden by other wires and parts at the bottom of the playfield..
The weird thing is I don't understand the history of this repair.
I can only think that several repair persons worked on this, one more skilled than the other.
Maybe first the transistor or something else failed on the pcb which made the mouth run all the time or only in 1 direction.
To solve this (maybe a quick fix on location ?) the blue wire controlling this was removed from the connector.
Later another tech who's more skilled worked on this game ? (or the same one, but he had forgotten what he had done before ?) He takes out the pcb, repairs the broken components, installs it and it doesn't work. He misses the removed wire because it's well hidden underneath the playfield, but does notice he needs some input to the board on that pin. So he attaches a jumper wire from one pin to the other.
Does selftests, mouth opens and closes correctly, problem solved.
(Except for when you want to start multiball, the mouth doesn't stay open, which is something you don't immediately notice)
The weird thing is the person I bought this game from had it over a year. As far as I know no tech worked on it in his house. This means all this time he never had a completely working game and could never start multiball ?? Unless by accident - if are lucky you can shoot a ball in Rudys mouth just when he is talking.
Never had such a weird fix. The board was already repaired, just 1 wire needed to be connected again. Easy for me (although I wasted too much time until I noticed it).
but at least I can enjoy Funhouse like it is meant !
(fixing the plungers for the eyes is something I'll to later when I have time to shop the game completely).
When I bought this Funhouse pinball machine it didn't work completely, Rudys mouth didn't stay open.
The mouth would open and close correctly during gameplay, as Rudy speaks to you when playing a game. But when you're in multiball then the mouth would not stay open. You couldn't lock your 3rd ball to start multiball. And there's no fun in the Funhouse if you can't start multiball !
I noticed a few teeth of the gear were stripped. When I bought the machine I thought this was the cause of the problem - the stripped teeth made the mouth close again. Replaced it with a new gear I had around.
To my amazement this did not solve the problem. When you lock 3 pinballs, Rudys mouth still closes again.
Did the selftests but didn't immediately notice anything wrong. During selftest the mouth opens and closes correct ?
Started to think about it (and thanks to a reply on RGP) it finally hit me - there's also a small pcb underneath the playfield which is involved in controlling the motor and its direction. That had to be the culprit.
Took out the pcb, measured every component, transistor, and all looked ok.
There was however a jumper wire connected on the input pins which shouldn't be there.
2 pins were jumpered together ? According to the schematics these were individual input pins.
Removed this extra wire. This was probably the source of my problem and why the gear had stripped - because of it the motor always ran in one direction ?
Put the pcb back in, suddenly it didn't work at all anymore. The mouth stayed closed.
What could it be ? I knew it was working before so the pcb should be ok.
Looked again at the pcb. Tested parts.. spent too much time measuring every transistor and resistor on it again. Looking to the solder side of the pcb it was obvious repairs had been done to it and a few components had been changed - but as far as I could measure these were now working well.
Checked the schematics, thought about this extra wire.. suddenly I noticed on the connector that went to the pcb, there was a wire missing !
You can see it in the below picture: at the very left side, one blue wire is bent backwards and it's end is nicely tucked away with some electric tape:
I attached the wire again to the connector and now Rudy works completely like he has to !
In the photo it's easy to spot, but that's because the pcb is hanging loose.
Normally it's attached in the very back at the bottom of the playfield. Because the playfield only rotates up (and doesn't slide forward like on more recent WPC machines) you really have to bend inside the cabinet to see it, and this wires are half hidden by other wires and parts at the bottom of the playfield..
The weird thing is I don't understand the history of this repair.
I can only think that several repair persons worked on this, one more skilled than the other.
Maybe first the transistor or something else failed on the pcb which made the mouth run all the time or only in 1 direction.
To solve this (maybe a quick fix on location ?) the blue wire controlling this was removed from the connector.
Later another tech who's more skilled worked on this game ? (or the same one, but he had forgotten what he had done before ?) He takes out the pcb, repairs the broken components, installs it and it doesn't work. He misses the removed wire because it's well hidden underneath the playfield, but does notice he needs some input to the board on that pin. So he attaches a jumper wire from one pin to the other.
Does selftests, mouth opens and closes correctly, problem solved.
(Except for when you want to start multiball, the mouth doesn't stay open, which is something you don't immediately notice)
The weird thing is the person I bought this game from had it over a year. As far as I know no tech worked on it in his house. This means all this time he never had a completely working game and could never start multiball ?? Unless by accident - if are lucky you can shoot a ball in Rudys mouth just when he is talking.
Never had such a weird fix. The board was already repaired, just 1 wire needed to be connected again. Easy for me (although I wasted too much time until I noticed it).
but at least I can enjoy Funhouse like it is meant !
(fixing the plungers for the eyes is something I'll to later when I have time to shop the game completely).
Wednesday, April 20, 2011
41 million points on Funhouse
Finally started to playi Funhouse more often. I bought it a few months ago, fixed it a while ago, but it only got a few occasional plays. Not that I don't like it, I really love it, but I'm now fixing games inside the gameroom (a Medieval Madness now came in to restore) and working on some projects, so my time is spent on those and not on long sessions playing pinball.
2 days ago my daughter wanted to play Funhouse but I had to teach her how to start multiball (she really likes to start multiball on any pinball machine, and already knows she can get a lot of points for it).
So with her sitting on a high chair in front of the game and I standing behind her (looking over her shoulder because else I couldn't see the flippers) I played a game.. and improved my highscore from 15million to 17 million. Not bad :)
The game didn't last very long, only started multiball once but was able to shoot a lot of jackpots.
Yesterday afternoon I was baking a cake, it was in the oven and I thought I have about 10 minutes left, time for a quick game of pinball.
Started to play FH and had the best game I ever had on any Funhouse pinball machine.
Was able to start multiball 3 times. When I had locked 2 balls for the 3rd time I remembered about the cake so I quickly ran inside the house to turn off the oven.. and then get back to shoot the ball into Rudys mouth :)
Final score, a bit over 41 million. Nice.
I really love the music when you've gotten a highscore and can enter your initials..
Sunday, April 17, 2011
Always Coca-cola
This is one for the most original pinball repairs list.
Repaired a Dirty Harry in the rec room of a restaurant.
Didn't have many details, also was told that the ball sometimes got stuck.
Play-tested a bit and indeed sometimes it got stuck between two ramps.
Didn't see something obvious wrong with the ramps, they were still screwed in place, nothing loose.. so I was looking for something to fix the ball hanging.
Needed something to put in between them and add some spacing.. looked around, didn't find anything useful, except for one empty Coca Cola bottle.
Took the cap, cut it in half, and stuck it tight between the ramps.
You can see it in the picture - left of the house there's a metal post supporting the top ramp. The red cap is next to it, pushing the bottom ramp a bit down.
Now the pinball doesn't get stuck anymore. After taking this picture I put some grey tape over it to cover and keep it in place.

Wednesday, April 6, 2011
Cactus Canyon repro guns and mountain
Something else I'm working on since a few weeks: learning to make my own molds in silicone and make reproductions from objects.
More specific, I'm trying to repro the Cactus Canyon mine mountain plastic and the gun handles.
A full article will appear on my site in the future when I'm finished and learned enough.
Cactus Canyon mountain plastics were unobtainable for the last years. Suddenly a few have appeared on ebay but they are much too expensive for me.
My mountain isn't really bad but not mint either.
Many years ago I looked a bit into casting parts in resin (Leon of pinballleon.com then also did and he sells Scared Stiff boney flippers he casts himself).
Since then I never needed anything.. until now.
Now buying a NOS cactus canyon mountain plastic is no option for me, it was time to pick up this project and try to make one myself to improve my pinball machine.
And I've seen pictures of someone who has customised his Cactus Canyon pinball machine by painting the gun handles and it looked great !
But I prefer to have original parts on my machine - therefor I also started to make a mold for the gun handles. It was easy to do as they're small and flat.
Now I can keep my original parts - in case I ever decide to sell my game and the buyer prefers to have everything original. But I can make replacement parts to paint and customize it like I want, and not be afraid of messing up a part that's not replaceable.
2 weeks ago I made a mold for the gun handles. Poured epoxy in it, worked fine.
First test was a success, I learned to make a mold and cast resin.
The mold for the gun handles is good. Details are nice and sharp. Compared side by side with an original you may see some very small differences, but installed in the machine you wouldn't know it was a reproduction piece.
Last week then I made a big mold for the lost mine mountain plastic.
Gave it enough time to cure, and this week I tried to cast my first plastics.
First didn't work well, I had used too much material. It was too thick and heavy.
The mountain is hollow, so unlike the gun handles, you can't just fill it completely with resin. Making a cast of this requires a special technique.
It was a good test for my mold to see if the shape was correct. Only where I had closed the hole it's not perfectly smooth.
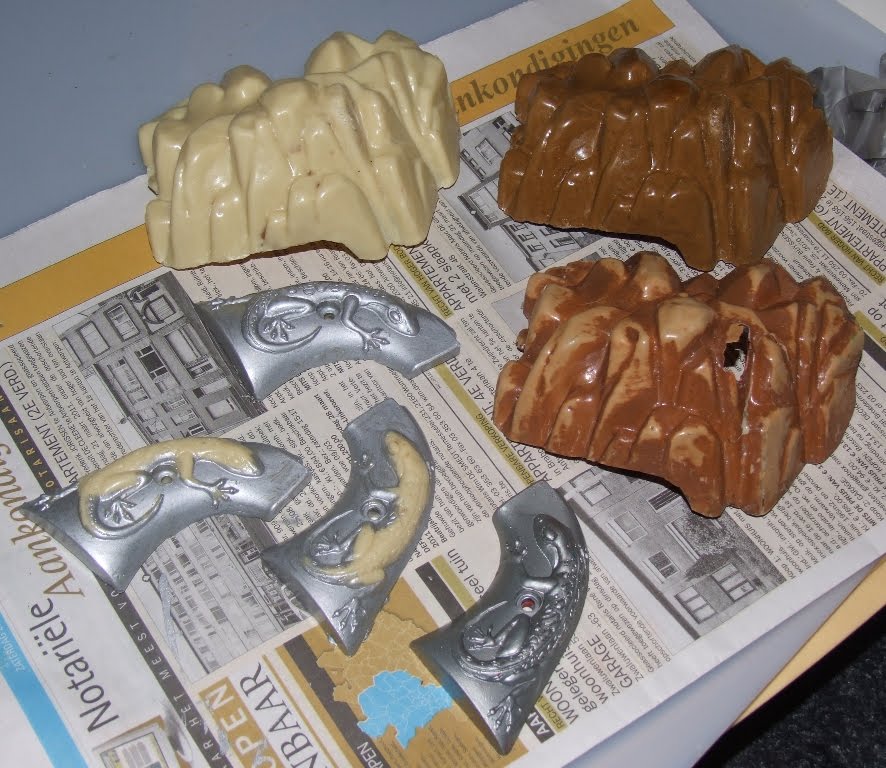
In the picture below you see my next trials. Middle right is my original lost mine plastic. At top left is my second attempt. The shape is fine, but it's a little bit too thin. I used about 60 gram of epoxy in that one. It also shows the natural color of the poly-urethane resin. I get better practice getting an even layer of resin all around, to cast a hollow object.
Top right is my third try of casting a cactus canyon mountain plastic.
I added brown pigment to it, trying to simulate the original color. Looks like I've added too much, the color is too dark. Also used a bit too much epoxy, about 80 grams in total. The mountain plastic is strong but the edges were difficult to cut. So next time I'll try 65 to 70 gram of epoxy and less brown pigment..
I'd like to get the resin in the correct color so I only have to paint additional color to have it match the original color scheme. If I don't succeed in matching the color I'll just take that unpainted one and give it two layers of paint so it matches. But too many layers of paint may block the light from the flasher lamp that's underneath in the game..

On the bottom in the picture are the gun handles. Bottom right is an original one.
The other three I've casted.
One painted completely silver, and the other two I haven't painted the lizard yet. Will paint this green (or maybe another color, I'm not sure yet).
I haven't made a mold yet for the rest of the gun, I'm considering doing this also.
Original they're black, but I think they'll look much better in chrome/silver, like real guns do. But as they're two large plastics, a lot of silicone will go into them.
Don't know yet if I want to spend that much on material just to cast one pair of guns for myself..
Update: article is ready about casting your own 3D pieces using a silicone mold.
More specific, I'm trying to repro the Cactus Canyon mine mountain plastic and the gun handles.
A full article will appear on my site in the future when I'm finished and learned enough.
Cactus Canyon mountain plastics were unobtainable for the last years. Suddenly a few have appeared on ebay but they are much too expensive for me.
My mountain isn't really bad but not mint either.
Many years ago I looked a bit into casting parts in resin (Leon of pinballleon.com then also did and he sells Scared Stiff boney flippers he casts himself).
Since then I never needed anything.. until now.
Now buying a NOS cactus canyon mountain plastic is no option for me, it was time to pick up this project and try to make one myself to improve my pinball machine.
And I've seen pictures of someone who has customised his Cactus Canyon pinball machine by painting the gun handles and it looked great !
But I prefer to have original parts on my machine - therefor I also started to make a mold for the gun handles. It was easy to do as they're small and flat.
Now I can keep my original parts - in case I ever decide to sell my game and the buyer prefers to have everything original. But I can make replacement parts to paint and customize it like I want, and not be afraid of messing up a part that's not replaceable.
2 weeks ago I made a mold for the gun handles. Poured epoxy in it, worked fine.
First test was a success, I learned to make a mold and cast resin.
The mold for the gun handles is good. Details are nice and sharp. Compared side by side with an original you may see some very small differences, but installed in the machine you wouldn't know it was a reproduction piece.
Last week then I made a big mold for the lost mine mountain plastic.
Gave it enough time to cure, and this week I tried to cast my first plastics.
First didn't work well, I had used too much material. It was too thick and heavy.
The mountain is hollow, so unlike the gun handles, you can't just fill it completely with resin. Making a cast of this requires a special technique.
It was a good test for my mold to see if the shape was correct. Only where I had closed the hole it's not perfectly smooth.
In the picture below you see my next trials. Middle right is my original lost mine plastic. At top left is my second attempt. The shape is fine, but it's a little bit too thin. I used about 60 gram of epoxy in that one. It also shows the natural color of the poly-urethane resin. I get better practice getting an even layer of resin all around, to cast a hollow object.
Top right is my third try of casting a cactus canyon mountain plastic.
I added brown pigment to it, trying to simulate the original color. Looks like I've added too much, the color is too dark. Also used a bit too much epoxy, about 80 grams in total. The mountain plastic is strong but the edges were difficult to cut. So next time I'll try 65 to 70 gram of epoxy and less brown pigment..
I'd like to get the resin in the correct color so I only have to paint additional color to have it match the original color scheme. If I don't succeed in matching the color I'll just take that unpainted one and give it two layers of paint so it matches. But too many layers of paint may block the light from the flasher lamp that's underneath in the game..
On the bottom in the picture are the gun handles. Bottom right is an original one.
The other three I've casted.
One painted completely silver, and the other two I haven't painted the lizard yet. Will paint this green (or maybe another color, I'm not sure yet).
I haven't made a mold yet for the rest of the gun, I'm considering doing this also.
Original they're black, but I think they'll look much better in chrome/silver, like real guns do. But as they're two large plastics, a lot of silicone will go into them.
Don't know yet if I want to spend that much on material just to cast one pair of guns for myself..
Update: article is ready about casting your own 3D pieces using a silicone mold.
AFM lights fixed
Follow up on my almost-never-ending AFM cpu problem.
Last year and the year before I've already posted about it here, the game sometimes didn't boot anymore, especially when touching the cpu board or its connectors.
Now the game suddenly developed another problem: no more lights on the playfield worked.
No GI, but also no controlled lights.
That's very weird as they're two separate circuits. So it's not just one fuse..
First did the regular stuff: measured fuses, checked the led, testpoint voltage, ..
on the powerboard everything was fine.
So the problem was not that there wasn't any power, it was that the instructions to turn the lamps on did not arrive on the powerboard.
With the problems I had last year with this cpu board I had suspected the ASIC ic. But then I couldn't continue problem solving the issue as I didn't have the correct ic puller. Now I have one, I have ordered it a while ago.
Pullde out the asic (very carefully). Put it back in, with enough pressure so it clicks in place. Turn the game on. And we have lights ! Pushed a bit on the cpu board and it doesn't reset anymore, so that problem is solved too.
Medieval Madness redecal
I redecaled my Medieval Madness backbox yesterday.
Top left side there was a lot of damage, large part of the backbox artwork was missing.
It probably was just peeled off once on location.
About 10x10cm had been repainted (blue and white lightning).
The other side was in very good condition. But I was going to redecal both sides to keep them similar. Doing one or both sides is only a little bit more work, and you never know the decals look a bit different. Better to do both sides.
I had bought new backbox decals many many years ago. I think 6 or 7 years ago - the first time MM cabinets were reproduced. All this time I had them laying around.
I don't intend to sell my MM ever, so I was not in a hurry to install them.
The game plays great without them installed :)
And machines have backboxes so close to eachother in my gameroom you couldn't see the damage anyway.
But anyway, it was still on this 'to do' list for so many years.
What mostly annoyed me was that these decals were still laying there, I had to move them around when I searched for something, had to take care not to damage them, ..
A while ago I started to make time to do all the things I ever planned to do, and yesterday these decals were planned.
So I rolled my pinball cart underneath the game and tried to get it outside.
Using some pieces of wood I was able to get the game mostly outside. Just a little part was still inside the door frame, I could just pass.
The back legs were in the grass..
I already have some experience redecaled pinball machines, I did two Indiana Jones pinball machines last year. Then I burnt the decals off. Using a heat gun (paint stripper) I heated the decal so it becomes flexible and with a putty knife I removed pieces of it. It is quite a mess. With the small putty knife you tear it in small parts. You especially have to take care not to heat it too long, because then the decal just melts (or burns) and gets stuck into the wood. Especially with the putty knife you have to be careful not to put the molten parts into the wood. If you do, sanding it away will take a long time.
Anyway, this time I tried to be even more careful and do an quicker and better job.
Yes, quicker and better. If you want to be fast removing decals and burn them, cleaning and sanding later takes you much more time. I really wanted to remove the original decals and leave as little glue or residue as possible on the wood.
With the heat gun on the lowest setting, I just quickly went over the decal. Similar to flamepolishing, I did not stop on a particular spot. Then using the putty knife I got the decal loose on one side of the cabinet, as you can see in the picture below.

Success ! It removes from the wood nicely and almost leaves no residu.
Instead of using the putty knife further, I now decided to remove it with my bare hands. Used the paint stripper one time to go over the whole decal, and then started to pull with my bare hands. I was amazed how well the decal came off !
Instead of small strips you get with a putty knife, now really big parts came off nicely. I think in about one minute I had removed the whole side decal !
The other side also went as smooth as this. Only the area that had been repainted took more time.
Once the decals were removed, I used the heat gun and putty knife to remove most of the glue residu. It wasn't very much (less than a quarter of the whole surface).
Did the same on the repainted part - using heatgun and putty knife I made it as smooth as possible.
Then sanding. I sanded both sides so they were completely smooth. Only one hole in the backbox had to be filled with wood filler.
It was starting to rain a little so I put some sheets over the game (to protect the boards), moving the game back into the gameroom wasn't something I could do fast because of the uneven floor..
So because the wood was in such good condition, I decided not to use a white primer paint. It would take a long time to dry, sand, ..
I just took a can of black paint and painted the edges.
Let that black paint dry for about 1,5 hour. Let the game sit outside in the garden (luckily it didn't rain much more). The paint was pretty smooth, to be sure I went over it with sandpaper so you couldn't feel any edges.
Putting the decals on was easy. The image print was really large, I had about 1 centimeter over on every side. So I didn't have to be extremely careful aligning everything.
I first cut off the top edge and used paper tape to secure the decal in place.
Double checked that when I rolled it down, it aligned like it had to be.
The original glue of the decal almost didn't stick. The decals were starting to become too old. So I used a spraycan of glue on the cabinet first.
Then I put the decals on. Slow and easy, starting on the top (where it was held in place with paper tape), and using a soft cloth I pushed the decal down onto the glued wood.
Repeated this on the other side.. Success !

Here's a photo of the decal glued in place.
Then using a hobby knife I cut the edges. Took a black marker and went over the edge of the cut (so you don't see a white line where the decal is cut but it's also black).
Cutting the edges was the most dangerous part of the whole job. Because the decals were already a few years old, it had lost some flexibility I think. When I folded it around the edge of the cabinet it just started to break (in an irregular line).
So very careful I cut it as straight as possible.
I had also painted the heads of the bolts black. They weren't dry yet. So only in the evening I put them back in.
I think it took be about 3 hours in total to do this redecal job. Not bad !
Btw - those who expect to see the update of my 365 photography project will have to wait. I still make pictures, but haven't found time to edit and upload them. Started to review them but haven't made any great pictures, they're all snapshots. So I decided not to post them. Will keep this blog for pinball-related things only from now on. I'll post some pictures on my facebook page, but only if they're worth posting.
Only interesting thing to post about it, is that two pictures I took were published last week in a newspaper ! A new restaurant will open behind our corner and the whole neighbourhood was invited to the presentation. A journalist interviewed us, but her photographer was stuck in traffic.. so I made pictures for her that were published :)
Subscribe to:
Posts (Atom)

